Lorenzo Bettini is an Associate Professor in Computer Science at the Dipartimento di Statistica, Informatica, Applicazioni "Giuseppe Parenti", Università di Firenze, Italy. Previously, he was a researcher in Computer Science at Dipartimento di Informatica, Università di Torino, Italy.
He has a Masters Degree summa cum laude in Computer Science (Università di Firenze) and a PhD in "Logics and Theoretical Computer Science" (Università di Siena).
His research interests cover design, theory, and the implementation of statically typed programming languages and Domain Specific Languages.
He is also the author of about 90 research papers published in international conferences and international journals.
HiDPI support in KDE Plasma has been recently improved! I’m afraid what’s not improved is the procedure for using that. In this post I’ll detail the steps to use HiDPI with KDE if you have a high resolution display (for example, I have that in my Linux Dell M3800).
Remember that the settings you change will not be applied completely until you logout and login again into KDE.
First of all, you need to go in Settings, then
“Display and Monitor” -> “Display Configuration“. If you scroll down you see a “Scale Display” button
Click on that and in the “Screen Scaling” dialog, drag the “Scale” in the middle, corresponding to a scale factor of 2 and press OK.
Then go back to the main page of Settings, select “Font“, and force to the DPI font to 168. (or even more if you want).
Apply the settings, logout and login again into KDE and you’ll enjoy your HiDPI display with a scale factor of 2, which basically means it will be usable 🙂
Be warned, KDE applications will look correctly, but there’ll still be other applications which might not have been implemented with HiDPI in mind… and they’ll still look horrible even with the scaling you set.
In a previous post I showed how to manage an Eclipse composite p2 repository and how to publish an Eclipse p2 composite repository on Sourceforge. In this post I’ll show a similar procedure to publish an Eclipse p2 composite repository on Bintray. The procedure is part of the Maven/Tycho build so that it is fully automated. Moreover, the pom.xml and the ant files can be fully reused in your own projects (just a few properties have to be adapted).
First of all, this procedure is quite different from the ones shown in other blogs (e.g., this one, this one and this one): in those approaches the p2 metadata (i.e., artifacts.jar and content.jar) are uploaded independently from a version, always in the same directory, thus overwriting the existing metadata. This leads to the fact that only the latest version of published features and bundles will be available to the end user. This is quite against the idea that old versions should still be available, and in general, all the versions should be available for the end users, especially if a new version has some breaking change and the user is not willing to update (see p2’s do’s and do not’s). For this reason, I always publish p2 composite repositories.
The goal of composite repositories is to make this task easier by allowing you to have a parent repository which refers to multiple children. Users are then able to reference the parent repository and the children’s content will transparently be available to them.
In order to achieve this, all published p2 repositories must be available, each one with their own p2 metadata that should never be overwritten.
On the contrary, the metadata that we will overwrite will be the one for the composite metadata, i.e., compositeContent.xml and compositeArtifacts.xml.
What I aim at is to have the following remote paths on Bintray:
releases: in this directory all p2 simple repositories will be uploaded, each one in its own directory, named after version.buildQualifier, e.g., 1.0.0.v20160129-1616/ etc. Your Eclipse users can then use the URL of one of these single update sites to stick to that specific version.
updates: in this directory the composite metadata will be uploaded. The URL https://dl.bintray.com/lorenzobettini/p2-composite-example/updates/ should be used by your Eclipse users to install the features in their Eclipse of for target platform resolution (depending on the kind of projects you’re developing). All versions will be available from this composite update site; I call this main composite. Moreover, you can provide the URL to a child composite update site that includes all versions for a given major.minor stream, e.g., https://dl.bintray.com/lorenzobettini/p2-composite-example/updates/1.0/, https://dl.bintray.com/lorenzobettini/p2-composite-example/updates/1.1/, etc. I call each one of these, child composite.
zipped: in this directory we will upload the zipped p2 repository for each version.
Summarizing we’ll end up with a remote directory structure like the following
1
2
3
4
5
6
7
8
9
10
11
12
13
14
15
16
17
18
19
20
21
22
23
24
25
26
27
28
root
|--releases
||--1.0.0.v2016...
|||--artifacts.jar
|||--content.jar
|||--features
||||--your feature.jar
|||--plugins
||||--your bundle.jar
||--1.1.0.v2016...
||--1.1.1.v2016...
||--2.0.0.v2016...
|...
|--updates
||--compositeContent.xml
||--compositeArtifacts.xml
||--1.0
|||--compositeContent.xml
|||--compositeArtifact.xml
||--1.1
|||--compositeContent.xml
|||--compositeArtifact.xml
||--2.0...
|...
|--zipped
|--your site1.0.0.v2016....zip
|--your site1.1.0.v2016....zip
...
Uploading using REST API
In the posts I mentioned above, the typical line to upload contents with the REST API is of the shape
Thanks to the Bintray Support, I managed to use a different scheme that allows me to store p2 metadata for a single p2 repository in the same directory of the p2 repository itself and to keep those metadata separate for each single release.
To achieve this, we need to use another URL scheme for uploading, using matrix params options or header options.
This means that we’ll upload everything with this URL
On the contrary, for uploading p2 composite metadata, we’ll use the schema of the other approaches, i.e., we will not associate it to any specific version; we just need to specify the desired remote path where we’ll upload the main and the child composite metadata.
Building Steps
During the build, we’ll have to update the composite site metadata, and we’ll have to do that locally.
The steps that we’ll perform during the Maven/Tycho build, which will rely on some Ant scripts can be summarized as follows:
Retrieve the remote composite metadata compositeContent/Artifacts.xml, both for the main composite and the child composite. If these metadata cannot be found remotely, we fail gracefully: it means that it is the first time we release, or, if only the child composite cannot be found, that we’re releasing a new major.minor version. These will be downloaded in the directories target/main-composite and target/child-composite respectively. These will be created anyway.
Preprocess possible downloaded composite metadata: if this property is present
We must temporarily set it to false, otherwise we will not be able to add additional elements in the composite site with the p2 ant tasks.
Update the composite metadata using the version information passed from the Maven/Tycho build using the p2 Ant tasks for composite repositories
Post process the composite metadata (i.e., put the property p2.atomic.composite.loading above to true, see https://bugs.eclipse.org/bugs/show_bug.cgi?id=356561 for further details about this property). UPDATE: Please have a look at the comment section, in particular, the comments from pascalrapicault, about this property.
Upload everything to bintray: both the new p2 repository, its zipped version and all the composite metadata.
IMPORTANT: the pre and post processing of composite metadata that we’ll implement assumes that such metadata are not compressed. Anyway, I always prefer not to compress the composite metadata since it’s easier, later, to manually change them or reviewing.
Technical Details
You can find the complete example at https://github.com/LorenzoBettini/p2composite-bintray-example. Here I’ll sketch the main parts. First of all, all the mechanisms for updating the composite metadata and pushing to Bintray (i.e., the steps detailed above) are in the project p2composite.example.site, which is a Maven/Tycho project with eclipse-repository packaging.
The pom.xml has some properties that you should adapt to your project, and some other properties that can be left as they are if you’re OK with the defaults:
XHTML
1
2
3
4
5
6
7
8
9
10
11
12
13
14
15
16
17
18
19
20
21
22
<properties>
<!-- The name of your own Bintray repository -->
<bintray.repo>p2-composite-example</bintray.repo>
<!-- The name of your own Bintray repository's package for releases -->
<bintray.package>releases</bintray.package>
<!-- The label for the Composite sites -->
<site.label>Composite Site Example</site.label>
<!-- If the Bintray repository is owned by someone different from your
user, then specify the bintray.owner explicitly -->
<bintray.owner>${bintray.user}</bintray.owner>
<!-- Define bintray.user and bintray.apikey in some secret place,
If you change the default remote paths it is crucial that you update the child.repository.path.prefix consistently. In fact, this is used to update the composite metadata for the composite children. For example, with the default properties the composite metadata will look like the following (here we show only compositeContent.xml):
XHTML
1
2
3
4
5
6
7
8
9
10
11
12
13
<?xml version='1.0'encoding='UTF-8'?>
<?compositeMetadataRepository version='1.0.0'?>
<repository name='Composite Site Example 1.0'type='org.eclipse.equinox.internal.p2.metadata.repository.CompositeMetadataRepository'version='1.0.0'>
You can also see that two crucial properties, bintray.user and, in particular, bintray.apikey should not be made public. You should keep these hidden, for example, you can put them in your local .m2/settings.xml file, associated to the Maven profile that you use for releasing (as illustrated in the following). This is an example of settings.xml
In the pom.xml of this project there is a Maven profile, release-composite, that should be activated when you want to perform the release steps described above.
We also make sure that the generated zipped p2 repository has a name with fully qualified version
XHTML
1
2
3
4
5
6
7
8
9
<!-- make sure that zipped p2 repositories have the fully qualified version -->
In the release-composite Maven profile, we use the maven-antrun-plugin to execute some ant targets (note that the Maven properties are automatically passed to the Ant tasks): one to retrieve the remote composite metadata, if they exist, and the other one as the final step to deploy the p2 repository, its zipped version and the composite metadata to Bintray:
The Ant tasks are defined in the file bintray.ant. Please refer to the example for the complete file. Here we sketch the main parts.
This Ant file relies on some properties with default values, and other properties that are expected to be passed when running these tasks, i.e., from the pom.xml
To retrieve the existing remote composite metadata we execute the following, using the standard Ant get task. Note that if there is no composite metadata (e.g., it’s the first release that we execute, or we are releasing a new major.minor version so there’s no child composite for that version) we ignore the error; however, we still create the local directories for the composite metadata:
XHTML
1
2
3
4
5
6
7
8
9
10
11
12
13
14
15
16
17
18
19
20
21
22
23
24
25
26
27
28
29
30
<!-- Take from the remote URL the possible existing metadata -->
<macrodef name="get-file"description="Use Ant Get task the file">
<attribute name="file" />
<attribute name="url" />
<attribute name="dest" />
<sequential>
<!-- If the remote file does not exist then fail gracefully -->
<echo message="Getting @{file} from @{url} into @{dest}..." />
<get dest="@{dest}"ignoreerrors="true">
<url url="@{url}/@{file}" />
</get>
</sequential>
</macrodef>
For preprocessing/postprocessing composite metadata (in order to deal with the property p2.atomic.composite.loading as explained in the previous section) we have
XHTML
1
2
3
4
5
6
7
8
9
10
11
12
13
14
15
16
17
18
19
20
21
22
23
24
25
<!-- p2.atomic.composite.loading must be set to false otherwise we won't be able
to add a child to the composite repository without having all the children available -->
Finally, to push everything to Bintray we execute curl with appropriate URLs, as we described in the previous section about REST API. The single tasks for pushing to Bintray are similar, so we only show one for uploading the p2 repository associated to a specific version, and the one for uploading p2 composite metadata. As detailed at the beginning of the post, we use different URL shapes.
To update composite metadata we execute an ant task using the tycho-eclipserun-plugin. This way, we can execute the Eclipse application org.eclipse.ant.core.antRunner, so that we can execute the p2 Ant tasks for managing composite repositories.
ATTENTION: in the following snipped, for the sake of readability, I split the <appArgLine> into several lines, but in your pom.xml it must be exactly in one (long) line.
XHTML
1
2
3
4
5
6
7
8
9
10
11
12
13
14
15
16
17
18
19
20
21
22
23
24
25
26
27
28
29
30
31
32
33
34
35
36
37
38
39
40
41
42
43
44
45
46
47
48
49
50
51
52
53
54
55
56
57
58
<plugin>
<groupId>org.eclipse.tycho.extras</groupId>
<artifactId>tycho-eclipserun-plugin</artifactId>
<version>${tycho-version}</version>
<configuration>
<!-- Update p2 composite metadata or create it -->
The file packaging-p2-composite.ant is similar to the one I showed in a previous post. We use the p2 Ant tasks for adding a child to a composite p2 repository (recall that if there is no existing composite repository, the task for adding a child also creates new compositeContent.xml/Artifacts.xml; if a child with the same name exists the ant task will not add anything new).
In case you want to remove an existing released version, since we upload the p2 repository and the zipped version as part of a package’s version, we just need to delete that version using the Bintray Web UI. However, this procedure will never remove the metadata, i.e., artifacts.jar and content.jar. The same holds if you want to remove the composite metadata. For these metadata files, you need to use the REST API, e.g., with curl. I put a shell script in the example to quickly remove all the metadata files from a given remote Bintray directory.
Performing a Release
For performing a release you just need to run
1
mvn clean verify-Prelease-composite
on the p2composite.example.tycho project.
Concluding Remarks
As I said, the procedure shown in this example is meant to be easily reusable in your projects. The ant files can be simply copied as they are. The same holds for the Maven profile. You only need to specify the Maven properties that contain values for your very project, and adjust your settings.xml with sensitive data like the bintray APIKEY.
After I upgraded my Dell Precision m3800 to the new Kubuntu Wily 15.10 I had a very bad surprise: the screen was continuously flickering in a way that it was unusable. This happens only if you are NOT using the default highest resolution 3200×1800 which, at least for me, is really too small.
I thought it was a problem with the new Plasma, but the culprit is the Intel i915 driver in the 4.2 kernel which comes with the new version of (K)ubuntu, as reported in this bug: https://bugs.freedesktop.org/show_bug.cgi?id=91393. In particular, two commits seem to be the cause, and reverting them fixes the problem (hopefully the whole bug will be fixed).
I’m detailing the procedure to get the kernel sources, reverting the two commits, and compile your own fixed kernel:
You need git to revert the patches (though you’re not getting the kernel sources from the git repository), so you need to install that if it’s not already installed.
Install the kernel sources for your current kernel: apt-get source linux-image-$(uname -r)
this will unpack the kernel sources in the current directory (you don’t need to use sudo for this; if you use sudo, you may want to change the owner of the sources’ directory to match your user, so that you won’t need to compile the kernel as root)
Install required packages to compile the kernel sudo apt-get build-dep linux-image-$(uname -r)
Install other required packages (needed when you install your compiled kernel later): sudo apt-get install linux-cloud-tools-common linux-tools-common
Enter in the directory where the kernel sources have been unpacked and revert the two commits in the reversed order: git apply -R patch2.txt git apply -R patch1.txt
Run the following commands in the kernel sources directory as described here: chmod a+x debian/scripts/* chmod a+x debian/scripts/misc/* fakeroot debian/rules clean
“In order to make your kernel “newer” than the stock Ubuntu kernel from which you are based you should add a local version modifier. Add something like “+test1″ to the end of the first version number in the debian.master/changelog file, before building. This will help identify your kernel when running as it also appears in uname -a.”
Compile the kernel (this will take some time, and require some free space on your hard disk): fakeroot debian/rules binary-headers binary-generic
This will create in the end some .deb files in the parent folder; install them all with dpkg, e.g., with sudo dpkg -i linux*4.2*.deb
In this blog post I’ll describe my experience in preparing an Oomph setup for a non-trivial Xtext project, Xsemantics.
This setup was kind of challenging because of the following features of my project, but I guess most of them can be found in any Xtext project:
generated sources are not stored in the Git repository (these include Xtend generated Java files and Java files generated during the MWE2 workflow)
the MWE2 workflow(s) must be run during the workspace setup (I have several DSLs in this project)
one of the DSL “inherits” from another DSL, so when running the MWE2 of the inheriting DSL the parent DSL must have already been built (i.e., Java classes must be compiled)
I hope this post can be useful for other Xtext developers.
This blog post assumes that you’re already familiar with Oomph and its authoring system.
The initial setup file can be created with the Oomph wizard, so I won’t talk about that.
Source folders in the repository
I found that it is better if all the source folders, including the source folders containing generated code, to be in the git repository. By “source folder” I mean a folder in an Eclipse project which is in the build path as a source folder. Thus, src-gen and xtend-gen should be in the git repository, but NOT their contents (at least, that’s what I want). Remember that git does not store empty folders, so you need to put a .gitignore in such folders stating to ignore everything but itself:
1
2
*
!.gitignore
This way, when the containing projects will be imported in Eclipse you won’t risk the Java compiler to stop immediately because of a missing source folder.
Note that this does not seem to always be required: there are projects that can be built anyway, but I found it easier to always include them all.
If you put the .gitignore in more than one *-gen folder you’ll get a warning from Eclipse since it tries to copy those files to the bin folder and it would end up with duplicates. You can avoid this warning by setting the preference “Java Compiler” => “Building” => “Output folder” => “Filtered resources” as shown in the screenshot (I also avoid copying other files into the bin folder):
Use platform URI in MWE2
You should change the grammarURI in your .mwe2 files: they should be platform URIs as opposed to classpath URIs. Otherwise, the MWE2 workflows will fail to find the Xtext grammars when run during the Oomph setup. An example is shown in the following screenshot
Creating a “root” feature for Targlets task
This is not strictly related to Xtext. For the targlets task, in order to specify my own features and bundles, I prefer to specify one single feature which acts as a root for all my Eclipse projects that must be imported in the workspace and that participate to the targ(l)et platform via their requirements. Remember that Oomph will resolve dependencies transitively also for your projects.
To this aim, I define a feature project, e.g., it.xsemantics.workspace (which by the way also contains the Oomph setup file).
In this feature project I specify feature and bundle dependencies to all my other projects (using a feature project just makes the dependency specification easier) in the shape of included plug-ins and included features. Typically the included features are the installable features that you deploy to an update site, and the included plug-ins are the test projects (which are not part of installable features):
You only need to make sure that transitively these inclusions span all your project’s features and bundles.
However, this won’t help for projects that are neither plug-in projects nor feature projects, like, e.g., all releng projects. Of course you could use the “Project Import” task, but I prefer to create a new “Component Extension” file:
Here you can specify additional dependencies, in particular, using the type “Project” to refer to Eclipse projects which are not plug-in projects (nor feature projects):
Now, when you define your “Targlets” you can refer to this root feature project, representing all your source projects. Then you can specify additional features for your target platform as usual:
Use variables for Xtext versions
Since I want to have separate Eclipses and workspaces for developing Xsemantics against the current version of Xtext 2.8.4 and the development version 2.9.0 (taken from the nightly update sites), I find it very important to refer to Xtext update sites using Oomph variables (in my case xtext.site and mwe2.size):
The values of such variables are defined in two separate Git branches specifications (you see I have variables also for API baseline settings, but I won’t talk about them since they’re not related to the aim of this post):
I’ll use those variables also for the “P2 director” tasks; this will ensure that the Xtext plug-ins I have in Eclipse will be the same as the ones in the target platform:
Running MWE2
This was the most challenging part: although Oomph provides a “Launch” task, running mwe2 workflows during the workspace setup has always been a problem (at least, that’s what I find in most places on the web).
First of all, you need to run the mwe2 launch AFTER the “Targlets” task and after a “Project Build” task
For the “Launch” task, you need to use the name of the .launch file, without .launch.
And here’s another small problem: of course the “Project build” task will leave the workspace full of error markers after the execution since the generated Java files are still not there; so the launch of the mwe2 workflow will make the famous popup dialog appear, asking whether you want to cancel the launch because of errors in the workspace… this is very annoying.
To avoid this, you can put a “Preference” task to always disable that dialog (you may want to renable that check later manually, after the workspace is provisioned):
Now the launch will start automatically without popup dialogs 🙂
By the way, don’t get fooled by the property name “cancel_launch…”; this actually corresponds to this preference “Continue launch…”:
Dealing with DSL dependencies
One of the Xsemantics DSL example “FJ cached” extends another DSL example “FJ”, thus, before running the MWE2 for “FJ cached” we must make sure that “FJ” has already been built, i.e., its MWE2 workflow has been executed and its Java sources have been compiled.
So we must insert another “Project Build” task at the right position:
That’s all!
Now the whole setup procedure will run smoothly and at the end all the projects will be imported and will show no sign of error (not even a warning 😉
Other features
This setup also features API baseline setting, and Mylyn Github query.
You may want to try it yourself; as stated above, Xsemantics is part of the official Oomph catalog. The whole procedure might take a few minutes to conclude. During the procedure, as always, you might be asked a few passwords, depending on the choices you made before starting the setup.
Conclusions
Oomph is great great great! 🙂 Ed Merks and Eike Stepper really made a wonderful project 🙂
I now started to port all my Xtext projects to Oomph. By the way, if your Xtext project is simpler (i.e., no DSL dependencies) you may want to have a look at another example, Java–, which is also part of the official Oomph catalog.
The problem I was having when running SWTBot tests in Travis CI was that I could not use the new container-based infrastructure of Travis, which allows to cache things like the local maven repository. This was not possible since to run SWTBot tests you need a Window Manager (in Linux, you can use metacity), and so you had to install it during the Travis build; this requires sudo and using sudo prevents the use of the container-based infrastructure. Not using the cache means that each build would download all the maven artifacts from the start.
Now you can use the container-based infrastructure and install metacity together (note that you won’t be able to cache installed apt packages, so each time the build runs, metacity will have to be reinstalled, but installing metacity is much faster than downloading all the Maven/Tycho artifacts).
The steps to run SWTBot tests in Travis can be summarized as follows:
YAML
1
2
3
4
5
6
7
8
9
10
11
12
13
14
15
16
17
18
19
20
21
22
23
24
25
26
sudo: false
language: java
jdk: oraclejdk7
cache:
directories:
-$HOME/.m2
env: DISPLAY=:99.0
install: true
addons:
apt:
packages:
-metacity
#before_install:
# - sudo apt-get update
# - sudo apt-get install metacity
before_script:
-sh-e/etc/init.d/xvfbstart
-metacity--sm-disable--replace2>metacity.err&
I left the old steps “before_install” commented out, just as a comparison.
“sudo: false” enables the container based infrastructure
“cache:” ensures that the Maven repository is cached
“env:” enables the use of graphical display
“addons:apt:packages” uses the extensions that allow you to install whitelisted APT packages (metacity in our case).
“before_script:” starts the virtual framebuffer and then metacity.
Then, you can specify the Maven command to run your build (here are some examples:
I’ve just started using the brand new Eclipse installer, and I’d like to report my experiences here. First of all, a big praise to Ed Merks and Eike Stepper for creating Oomph, on which the installer is based. 🙂
First of all, the installer is currently available in the “Developer Builds” section:
Once you downloaded it and extracted it, just run the executable oomph:
If you see an exclamation mark (on the top right corner), click on it, you’ll see some updates are available, so update it right away, and when it’s done, press OK to restart it.
The very same top right corner, also opens a menu for customization of some features, the one I prefer is the Bundle Pool, a cool feature that has been in Eclipse for so many years, and so very badly advertised, I’m afraid!
“p2 natively supports the notion of bundle pooling. When using bundle pooling, multiple applications share a common plugins directory where their software is stored. There is no duplication of content, and no duplicated downloads when upgrading software.”
One of the cool things of Oomph is that it natively and automatically supports bundle pools, it makes it really easy to manage them and makes installation faster and with less space requirements (what’s already been downloaded and installed won’t have to be downloaded and installed again for further Eclipse installations).
If you select that menu item, you can manage your bundle pools; the installer already detected existing bundle pools (I’ve been using them myself, manually, for some time now, and it detected that):
For this blog post I will create another bundle pool, just for testing. To create a new bundle pool, you first need to create a new p2 agent; the agent is responsible to manage the bundle pool, and to keep track of all the bundles that a specific Eclipse installation requires (this is also known as a p2 profile).
So I select “New Agent…” and choose a location in my hard disk; this will also set a bundle pool:
Just for demonstration, I’ll select the “pool”, “Delete…”, and create a “New Bundle Pool…” for the new agent, in another directory:
Then I select the new bundle pool, and press “OK”.
From now on, all the installations will be managed by the new agent, and all bundles will be stored in the new bundle pool.
OK, now, back to the main window, let’s start installing “Eclipse IDE for Java Developers”
In the next windows, I choose to install the new Eclipse in a different folder from the proposed default:
Let’s press “INSTALL”, and accept the LICENSE, the installation starts:
You’ll see that the installer is really quick (as far as I know, Oomph improved p2 internal mechanisms). It only took about a minute to install this Eclipse on my computer.
Then, you’re ready to launch this installation, or see the installation log.
But first, let’s have a look at the directory layout:
you see that the installed eclipse does not have the typical directory structure: it has no “features”/”plugins” directories: these are in the shared bundle pool. Also note that the p2 agent location has a directory representing the profile of the installed Eclipse.
Let’s try and install another Eclipse, e.g., the “Eclipse DSL Tools” (what else if not the one with the cool Xtext framework? 😉
The dialog proposes an installation directory based on my previous choice; I also select “Luna” as the platform:
Let’s press “INSTALL”… WOW! This time it’s even faster! You know why: only the new bundles are downloaded, everything else is shared. This also means: less space wasted on your hard disk! 🙂
But there are cooler things: Bundle pool management!
Go back to the “Bundle Pool Management” dialog, select the checkbox “Show Profiles” and you see the profiles handled by the current agent:
This is the follow up of my previous post about building a custom Eclipse distribution. In this post I’ll show how to deploy the p2 site and the zipped products on Sourceforge. Concerning the p2 site, I’ll use the same technique, with some modifications, for building a composite update site and deploy it with rsync that I showed on another post.
In particular, we’ll accomplish several tasks:
creating and deploying the update site with only the features (without the products)
creating and deploying the update site including product definition and the zipped provisioned products
creating a self-contained update site (including all the dependencies)
providing an ant script for installing your custom Eclipse from the net
The source code assumes a specific remote directory on Sourceforge, that is part of one of my Sourceforge projects, and it is writable only with my username and password. If you want to test this example, you can simply modify the property remote.dir in the parent pom specifying a local path in your computer (or by passing a value to the maven command with the syntax -Dremote.dir=<localpath>). Indeed, rsync can also synchronize two local directories.
Recall that when you perform a synchronization, specifying the wrong local directory might lead to a complete deletion of that directory. Moreover, source and destinations URLs in rsync have a different semantics depending on whether they terminate with a slash or not, so make sure you understand them if you need to customize this ant file or to pass special URLs.
Creating and Deploying the p2 composite site
This part reuses most of what I showed in the previous posts:
In this blog post we want to be able to add a new p2 site to the composite update site (and deploy it) for two different projects:
customeclipse.example.site: This is the update site with only our features and bundles
customeclipse.example.ide.site: This is the update site with our features and bundles and the Eclipse product definition.
To reuse the ant files for managing the p2 composite update site and syncing it with rsync, and the Maven executions that use such ant files, we put the ant files in the parent project customeclipse.example.tycho, and we configure the Maven executions in the pluginManagement section of the parent pom.
We also put in the parent pom all the properties we’ll use for the p2 composite site and for rsync (again, please have a look at the previous posts for their meaning)
XHTML
1
2
3
4
5
6
7
8
9
10
11
12
13
14
15
16
17
18
19
20
<!-- properties for deploying the composite update site and zipped products on Sourceforge -->
<!-- since this is used in the pluginManagement section, we need to make sure
the path always points to this pom's directory; project.basedir will always point
to the directory of the pom where the pluginManagement's plugins are used -->
ATTENTION: in the following snipped, for the sake of readability, I split the <appArgLine> into several lines, but in your pom.xml it must be exactly in one (long) line.
Now, we can simply activate such plugins in the build sections of our site projects described above.
In particular, we activate such plugins only inside profiles; for example, in the customeclipse.example.site project we have:
XHTML
1
2
3
4
5
6
7
8
9
10
11
12
13
14
15
16
17
18
19
20
21
22
23
24
25
26
27
28
29
30
31
32
33
34
<profiles>
<profile>
<id>release-composite</id>
<activation>
<activeByDefault>false</activeByDefault>
</activation>
<build>
<plugins>
<plugin>
<!-- this is configured in pluginManagement section of the parent pom -->
<groupId>org.eclipse.tycho.extras</groupId>
<artifactId>tycho-eclipserun-plugin</artifactId>
</plugin>
</plugins>
</build>
</profile>
<profile>
<id>deploy-composite</id>
<activation>
<activeByDefault>false</activeByDefault>
</activation>
<build>
<plugins>
<plugin>
<!-- this is configured in pluginManagement section of the parent pom -->
<artifactId>maven-antrun-plugin</artifactId>
</plugin>
</plugins>
</build>
</profile>
</profiles>
In customeclipse.example.ide.site we have similar sections, but the profiles are called differently, release-ide-composite and deploy-ide-composite, respectively.
So, if you want to update the p2 composite site with a new version containing only the features/bundles and deploy it on Sourceforge you need to run maven as follows
If you want to do the same, including the custom product definitions you need to run maven as follows (the additional build-ide profile is required because the customeclipse.example.ide.site is included as a Maven module only when that profile is activated; this way, products are created only when that profile is activated – just because provisioning a product requires some time and we don’t want to do that on normal builds)
NOTE: The remote directory on Sourceforge hosting the composite update site will always be the same. This means that the local composite update site created and updated by both deploy-composite and deploy-ide-composite will be synchronized with the same remote folder.
In the customeclipse.example.ide.site, we added a p2.inf file with touchpoint instructions to add as update site in our Eclipse products the update site hosted on Sourceforge: http://sourceforge.net/projects/eclipseexamples/files/customeclipse/updates.
Deploying the zipped products
To copy the zipped products on Sourceforge we will still use rsync; actually, we won’t use any synchronization features: we only want to copy the zip files. I could have used the Ant Scp or Sftp tasks, but I experienced many problems with such tasks, so let’s use rsync also for that.
The ant file for rsync is slightly different with respect to the one shown in the previous post, since it has been refactored to pass the rsync macro more parameters. We still have the targets for update/commit synchronization; we added another target that will be used to simply copy something (i.e., the zipped products) to the remote directory, without any real synchronization. You may want to have a look at rsync documentation to fully understand the command line arguments.
In the customeclipse.example.ide.site, in the deploy-ide-composite profile, we configure another execution for the maven ant plugin (recall that in this profile the rsync synchronization configured in the parent’s pom pluginManagement section is also executed); this further execution will copy the zipped products to a remote folder on Sourceforge (as detailed in the previous post, you first need to create such folder using the Sourceforge web interface):
XHTML
1
2
3
4
5
6
7
8
9
10
11
12
13
14
15
16
17
18
19
20
21
22
23
24
25
26
27
28
29
30
31
32
33
34
35
36
37
<profile>
<id>deploy-ide-composite</id>
<activation>
<activeByDefault>false</activeByDefault>
</activation>
<build>
<plugins>
<plugin>
<!-- this is configured in pluginManagement section of the parent pom -->
<artifactId>maven-antrun-plugin</artifactId>
<!-- and we add the execution for copying zipped products -->
<executions>
<execution>
<id>deploy-ides</id>
<phase>verify</phase>
<configuration>
<target>
<ant antfile="${ant-files-path}/rsync.ant"
target="rsync-copy-dir-contents">
<property name="rsync.remote.dir"
value="${remote.dir}/products/"/>
<property name="rsync.local.dir"
value="${project.build.directory}/products/"/>
</ant>
</target>
</configuration>
<goals>
<goal>run</goal>
</goals>
</execution>
</executions>
</plugin>
</plugins>
</build>
</profile>
Note that when calling the rsync-copy-dir-contents of the rsync.ant file, we pass the properties as nested elements, in order to override their values (such properties’ value are already defined in the parent’s pom, and for this run we need to pass different values).
rsync will synchronize our local composite update site with the remote composite update site
a new p2 site will be created, and added to our local composite update site
rsync will synchronize our local changes with the remote composite update site
Eclipse products will be created and zipped
the zipped products will be copied to Sourceforge
A self-contained p2 repository
Recall from the previous post that since in customeclipse.example.ide.feature we added Eclipse features (such as the platform and jdt) as dependencies (and not as included features), then the p2 update site we’ll create will not contain such features: it will contain only our own features and bundles. And that was actually intentional.
However, this means that the users of our features and of our custom Eclipse will still need to add the standard Eclipse update site before installing our features or updating the installed custom Eclipse.
If you want your p2 repository to be self-contained, i.e., to include also the external dependencies, you can do so by setting includeAllDependencies to true in the configuration of the tycho-p2-repository-plugin.
It makes sense to do that in the customeclipse.example.ide.site, so that all the dependencies for our custom Eclipse product will end up in the p2 repository:
XHTML
1
2
3
4
5
6
7
8
9
10
11
12
13
14
15
16
17
18
19
20
21
22
<profiles>
<profile>
<id>release-ide-composite</id>
<activation>
<activeByDefault>false</activeByDefault>
</activation>
<properties>
<!-- set it to true to have a self contained p2 repository https://wiki.eclipse.org/Tycho/eclipse-repository#Creating_a_self-contained_p2_repository -->
However, doing so every time we add a new p2 update site to the composite update site would make our composite update site grow really fast in size. A single p2 repository for this example, including all dependencies is about 110Mb. A composite update site with just two p2 repositories would be 220Mb, and so on.
I think a good rule of thumb is
include all dependencies the first time we release our product’s update site (setting the property includeAllDependencies to true, and then setting it to false right after the first release)
for further releases do not include dependencies
include the dependencies again when we change the target platform of our product (indeed, Tycho will take the dependencies from our target platform)
Provide a command line installer
Now that our p2 composite repository is on the Internet, our users can simply download the zip file according to their OS, unzip it and enjoy it. But we could also provide another way for installing our custom Eclipse: an ant file so that the user will have to
The ant file will use the p2 director command line application to install our Eclipse product directly from the remote update site (the ant file is self-contained since if the director application is not already installed, it will install it as the first task).
Here’s the install.ant file (note that we ask the director to install our custom Eclipse product, customeclipse.example.ide and, explicitly, the main feature customeclipse.example.feature; this reflects what we specified in the product configuration, in particular, the fact that customeclipse.example.feature must be a ROOT feature, so that it can be updatable – see all the details in the previous post)
Note that this will always install the latest version present in the remote composite update site.
For instance, consider that you created zipped products for version 1.0.0, then you deployed a small upgrade only for your features, version 1.0.1, i.e., without releasing new zipped products. The ant script will install the custom Eclipse including version 1.0.1 of your features.
After I deployed the self-contained p2 repository and the zipped products (activating the profiles release-ide-composite and deploy-ide-composite, with the property includeAllDependencies set to true, using the project customeclipse.example.ide.site), I deployed another p2 repository into the composite site only for the customeclipse.example.feature (activating the profiles release-composite and deploy-composite, i.e., using the project customeclipse.example.site).
Unzip the downloaded product, and check for updates (recall that the product is configured with the update site hosted on Sourceforge, through the p2.inf file described before). You will find that there’s an update for the Example Feature:
After the upgrade and restart you should see the new version of the feature installed:
You’ll have to wait a few minutes (and don’t worry about cookie warnings); run this version of the custom Eclipse, and you’ll find no available updates: check the installation details and you’ll see you already have the latest version of the Example Feature.
That’s all! Hope you find this post useful and… Happy Easter 🙂
In this tutorial I’ll show how to build a custom Eclipse distribution with Maven/Tycho. We will create an Eclipse distribution including our own features/plugins and standard Eclipse features, trying to keep the size of the final distribution small.
First of all, we want to mimic the Eclipse SDK product and Eclipse SDK feature; have a look at your Eclipse Installation details
You see that “Eclipse SDK” is the product (org.eclipse.sdk.ide), and “Eclipse Project SDK” is the feature (org.eclipse.sdk.feature.group).
Moreover, we want to deal with a scenario such that
Our custom feature can be installed in an existing Eclipse installation, thus we can release it independently from our custom Eclipse distribution. Our custom Eclipse distribution must be updatable, e.g., when we release a new version of our custom feature.
The project representing our parent pom will be
customeclipse.example.tycho
The target platform is defined in
customeclipse.example.targetplatform
For this example we only need the org.eclipse.sdk feature and the native launcher feature
We created a plugin project and a feature project including such plugin (the plugin is nothing fancy, just an “Hello World Command” created with the Eclipse Plug-in project wizard):
customeclipse.example.plugin
customeclipse.example.feature
We also create another project for the p2 repository (Tycho packaging type: eclipse-repository) that distributes our plugin and feature (including the category.xml file)
customeclipse.example.site
All these projects are then configured with Maven/Tycho pom.xml files.
Then we create another feature that will represent our custom Eclipse distribution
customeclipse.example.ide.feature
This feature will then specify the features that will be part of our custom Eclipse distribution, i.e., our own feature (customeclipse.example.feature) and all the features taken from the Eclipse update sites that we want to include in our custom distribution.
Finally, we create another site project (Tycho packaging type: eclipse-repository) which is basically the same as customeclipse.example.site, but it also includes the product definition for our custom Eclipse product:
customeclipse.example.ide.site
NOTE: I’m using two different p2 repository projects because I want to be able to release my feature without releasing the product (see the scenario at the beginning of the post). This will also allow us to experiment with different ways of specifying the features for our custom Eclipse distribution.
Product Configuration
This is our product configuration file customeclipse.example.ide.product in the project customeclipse.example.ide.site and its representation in the Product Configuration Editor:
Note that we use org.eclipse.sdk.ide and org.eclipse.ui.ide.workbench for launching product extension identifier and application (we don’t have a custom application ourselves).
ATTENTION: Please pay attention to “uid” and “id” in the .product file, which correspond to “ID” and “Product” in the Product definition editor (quite confusing, isn’t it? 😉
This product configuration includes our customeclipse.example.ide.feature; we also inserted in the end the standard start level configuration, and other properties, like the standard workspace location.
The pom in this project will also activate the product materialization and archiving (we also specify the file name of the zip with our own pattern):
XHTML
1
2
3
4
5
6
7
8
9
10
11
12
13
14
15
16
17
18
19
20
21
22
23
24
25
26
27
28
<plugin>
<groupId>org.eclipse.tycho</groupId>
<artifactId>tycho-p2-director-plugin</artifactId>
<version>${tycho-version}</version>
<executions>
<execution>
<id>materialize-products</id>
<goals>
<goal>materialize-products</goal>
</goals>
</execution>
<execution>
<id>archive-products</id>
<goals>
<goal>archive-products</goal>
</goals>
</execution>
</executions>
<configuration>
<products>
<product>
<!-- The uid in the .product file, NOT the name of the .product file -->
We chose NOT to include org.eclipse.example.ide.site as a module in our parent pom.xml: we include it only when we enable the profile build-ide: installing and provisioning a product takes some time, so you may not want to do that on every build invocation. In that profile we add the customeclipse.example.ide.site module, this is the relevant part in our parent pom
In this profile, we also specify the environments for which we’ll build our custom Eclipse distribution. When this profile is not active, the target-platform-configuration will use only the current environment.
In the rest of the tutorial we’ll examine different ways of defining customeclipse.example.ide.feature. In my opinion, only the last one is the right one; but that depends on what you want to achieve. However, we’ll see the result and drawbacks of all the solutions.
That’s because it tries to include in customeclipse.example.ide.feature.source the source feature of org.eclipse.sdk, which does not exist (org.eclipse.sdk already includes sources of its included features). You need to tell the tycho plugin to skip the source of org.eclipse.sdk:
<!-- These are bundles and feature that do not have a corresponding
source version; NOT the ones that we do not want source versions -->
<feature id="org.eclipse.sdk" />
</excludes>
</configuration>
</execution>
</executions>
</plugin>
The build should succeed.
Let’s copy the installed product directory (choose the one for your OS platform) to another folder; we perform the copy because a subsequent build will wipe out the target directory and we want to do some experiments. Let’s run the product and we see that our custom IDE shows our custom feature menu “Sample Menu” and the corresponding tool bar button:
If we check the installation details we see the layout mimicking the ones of Eclipse SDK (which is included in our product)
Now let’s run the build again with above maven command.
If you have a look at the target directory you see that besides the products, in custom.eclipse.ide.site/target you also have a p2 repository,
we will use the p2 repository to try and update the custom ide that we created in the first maven build (the one we copied to a different directory and that we ran in the previous step). So let’s add this built repository (in my case is /home/bettini/work/eclipse/tycho/custom-eclipse/customeclipse.example.ide.site/target/repository/) in the custom ide’s “Install New Software” dialog.
You see our Example Feature, and if you uncheck Group items by category you also see the Custom Eclipse Project SDK feature (corresponding to customeclipse.example.ide.feature) and Custom Eclipse SDK (corresponding to our product definition uid customeclipse.example.ide).
But wait… only the product is updatable! Why? (You see that’s the only one with the icon for updatable elements; if you try “Check for updates” that’s the only one that’s updatable)
Why can’t I update my “Example Feature” by itself?
If you try to select “Example Feature” in the “Install” dialog to force the update, and press Next…
you’ll get an error, and the proposed solution, i.e., also update the product itself:
And if you have a look at the original error…
…you get an idea of the problem beneath: since we INCLUDED our “customeclipse.example.feature” in our product’s feature “customeclipse.example.ide.feature” the installed product will have a strict version requirement on “customeclipse.example.feature”: it will want exactly the version the original product was built with; long story short: you can’t update that feature, you can only update the whole product.
Before going on, also note in the target directory you have a zip of the p2 repository that has been created: customeclipse.example.ide.site-1.0.0-SNAPSHOT.zip it’s about 200 MB! That’s because the created p2 repository contains ALL the features and bundles INCLUDED in your product (which in our case, it basically means, all features INCLUDED in “customeclipse.example.ide.feature”).
Require org.eclipse.sdk
Let’s try and modify “customeclipse.example.ide.feature” so that it does NOT include the features, but DEPENDS on them (we can also set a version range for required features).
First of all, note that the p2 repository zip in the target folder of customeclipse.example.ide.site is quite small! Indeed, the repository contains ONLY our features, not all the requirements (in case, you can also force Tycho to include all the requirements), since, as stated above, the required feature will not be part of the repository.
Now let’s do the experiment once again:
copy the built product for your OS into another directory
run the product custom ide
run another maven build
add the new created p2 repository in the custom ide “Install new software” dialog
Well… the Example Feature does not appear as updatable, but this time, if we select it and press Next, we are simply notified that it is already installed, and that it will be updated
So we can manually update it, but not automatically (“Check for updates” will still propose to update the whole product).
At the time of writing the Eclipse product definition editor does not support this feature, so we must edit the .product definition manually and add the line for specifying that customeclipse.example.feature must be a root level feature:
Let’s do the experiment again; but before trying to update let’s see that the installed software layout is now different: our Example Feature is now a root level feature (it’s also part of our Custom SDK IDE since it’s still required by customeclipse.example.ide.feature but that does not harm, and you may also want to remove that as a requirement in customeclipse.example.ide.feature).
Hey! This time our “Example Feature” is marked as updatable
and also Check for updates proposes “Example Feature” as updatable independently from our product!
What happens if we make also customeclipse.example.ide.feature” a root feature? You may want to try that, and the layout of the installed software will list 3 root elements: our product “Custom Eclipse SDK”, our ide.feature “Custom Eclipse Project SDK” (which is meant to require all the software from other providers, like in this example, the org.eclipse.sdk feature itself) and our “Example Feature”.
This means that also “Custom Eclipse Project SDK” can be updated independently; this might be useful if we plan to release a new version of the ide.feature including (well, depending on) other software not included in Eclipse SDK itself (e.g., Mylyn, Xtext, or something else). At the moment, I wouldn’t see this as a priority so I haven’t set customeclipse.example.ide.feature as a root level feature in the product configuration.
Minimal Distribution
The problem of basing our distribution on org.eclipse.sdk is that the final product will include many features and bundles that you might not want in your custom distribution; e.g., CVS features, not to mention all the sources of the platform and PDE and lots of documentation. Of course, if that’s what we want, then OK. But if we want only the Java Development Tools in our custom distribution (besides our features of course)?
We can tweak the requirements in customeclipse.example.ide.feature and keep them minimal (note that the platform feature is really needed):
Note also that the installed software has been reduced a lot:
The size of the zipped products dropped down to about 90Mb, instead of about 200Mb as they were before when we were using the whole org.eclipse.sdk feature.
However, by running this product you may notice that we lost some branding
There’s no Welcome Page
Eclipse starts with “Resource” Perspective, instead of “Java” Perspective
Help => About (Note only “About” no more “About Eclipse SDK”) shows:
To recover the typical branding of Eclipse SDK, we have to know that such branding is implemented in the bundle org.eclipse.sdk (the bundle, NOT the homonymous feature).
So, all we have to do is to put that bundle in our feature’s dependencies
This can be seen as a follow-up post of my previous post on building Eclipse p2 composite repositories. In this blog post I’ll show an automatic way for publishing an Eclipse p2 (composite) repository (a.k.a. update site) on Sourceforge, using rsync for synchronization. You may find online many posts about publishing update sites on Github pages and recently on bintray. (as a reminder, rsync is a one-way synchronization tool, and we assume that the master replica is the one on sourceforge; rysnc, being a synchronization tool, will only transfer the changed files during synchronization).
I prefer sourceforge for some reasons:
you have full and complete access to the files upload system either with a shell or, most importantly for the technique I’ll describe here, with rsync. From what I understand, instead, bintray will manage the binary artifacts for you;
in order to create and update a p2 composite site you must have access to the current file system layout of the p2 update site, which I seem to understand is not possible with bintray;
you have download statistics and your artifacts will automatically mirrored in sourceforge’s mirrors.
By the way: you can store your git repository anywhere you want, and publish the binaries on sourceforge. (see this page and this other page).
The steps of the technique I’ll describe here can be summarized as follows: when it comes to release a new child in the p2 composite update site (possibly already published on Sourceforge), the following steps are performed during the Maven/Tycho build
Use rsync to get an update local version of the published p2 composite repository somewhere in your file system (this includes the case when you never released a version, so you’ll get a local empty directory)
Build the p2 repository with Tycho
Add the above created p2 repository as a new child in the local p2 composite repository (this includes the case where you create a new composite repository, since that’s your first release)
Use rsync to commit the changes back to the remote p2 composite repository
Since we use rsync, we have many opportunities:
we’re allowed to manually modify (i.e., from outside the build infrastructure) the p2 composite repository, for instance by removing a child repository containing a wrong release, and commit the changes back;
we can release from any machine, notably from Jenkins or Hudson, since we always make sure to have a synchronized local version of the released p2 composite repository.
Prepare the directory on Sourceforge
This assumes that you have an account on Sourceforge, that you have registered a project. You need to create the directory that will host your p2 composite repository in the “Files” section.
For this example I created a new project eclipseexamples, https://sourceforge.net/projects/eclipseexamples/, and I plan to store the p2 composite in the sourceforge file system on this path: p2composite.example/updates.
So I’ll create the directory structure accordingly (using the “Add Folder” button:
Ant script for rsync
I’m using an ant script since it’s easy to call that from Maven, and also manually from the command line. This assumes that you have already rsync installed on your machine (or in the CI server from where you plan to perform releases).
This ant file is meant to be completely reusable.
Here’s the ant file
XHTML
1
2
3
4
5
6
7
8
9
10
11
12
13
14
15
16
17
18
19
20
21
22
23
24
25
26
27
28
29
30
31
32
33
34
35
36
37
38
39
40
41
42
43
44
45
46
47
48
49
50
51
52
53
54
55
56
<?xml version="1.0"encoding="UTF-8"?>
<project name="Rsync from Ant"basedir=".">
<!-- local source directory for rsync (read from this directory) -->
We have a macro for invoking rsync with the desired options (have a look at rsync documentation for understanding their meaning, but it should be straightforward to get an idea).
In particular, the transfer will be done with ssh, so you must have an ssh key pair, and you must have put the public key on your account on sourceforge. Either you created the key pair without a passphrase (e.g., for releasing from a CI server of your own), or you must make sure you have already unlocked the key pair on your local machine (e.g., with an ssh-agent, or with a keyring, depending on your OS).
The arguments source and dest will depend on whether we’re doing an update or a commit (see the two ant targets). If you define the property dryrun as -n then you can simulate the synchronization (both for update and commit); this is important at the beginning to make sure that you synchronize what you really mean to synchronize. Recall that when you perform an update, specifying the wrong local directory might lead to a complete deletion of that directory (the same holds for commit and the remote directory).Moreover, source and destinations URLs in rsync have a different semantics depending on whether they terminate with a slash or not, so make sure you understand them if you need to customize this ant file or to pass special URLs.
The properties rsync.remote.dir and rsync.local.dir will be passed from the Tycho build (or from the command line if you call the ant script directly). Once again, please use the dryrun property until you’re sure that you’re synchronizing the right paths (both local and remote).
Releasing during the Tycho build
Now we just need to call this ant’s targets appropriately from the Tycho build; I’ll do that in the pom.xml of the project that builds and updates the composite p2 repository.
Since I don’t want to push a new release on the remote site on each build, I’ll configure the plugins inside a profile (it’s up to you to decide when to release): here’s the new part:
XHTML
1
2
3
4
5
6
7
8
9
10
11
12
13
14
15
16
17
18
19
20
21
22
23
24
25
26
27
28
29
30
31
32
33
34
35
36
37
38
39
40
41
42
43
44
45
46
47
48
49
50
51
52
53
54
55
56
57
58
<profiles>
<profile>
<id>release-composite</id>
<activation>
<activeByDefault>false</activeByDefault>
</activation>
<properties>
<!-- local source directory for rsync (read from this directory) -->
The local URL specifies where the local p2 composite site is stored (see the previous post), in this example it defaults to
${user.home}/p2.repositories/updates/
Again, the final / is crucial.
We configured the maven-antrun-plugin with two executions:
before updating the p2 composite update site (phase prepare-package) we make sure we have a synchronized local version of the repository
after updating the p2 composite update site (phase verify) we commit the changes to the remote repository
That’s all 🙂
Let’s try it
Of course, if you want to try it, you need a project on sourceforge and a directory on that project’s Files section (and you’ll have to change the URLs accordingly in the pom file).
To perform a release we need to call the build enabling the profile release-composite, and specify at least verify as goal:
Shell
1
mvn clean verify-Prelease-composite
Let’s say we still haven’t released anything.
Since the remote directory is empty, in our local file system we’ll simply have the directory created. In the end of the build, the composite site is created and the remote directory will be synchronized with our local contents:
[/usr/lib/jvm/java-7-oracle/jre/bin/java,-jar,/media/app/.m2/repository/p2/osgi/bundle/org.eclipse.equinox.launcher/1.3.0.v20140415-2008/org.eclipse.equinox.launcher-1.3.0.v20140415-2008.jar,-install,/home/bettini/work/eclipse/p2composite/p2composite-example/p2composite.example.site/target/eclipserun-work,-configuration,/home/bettini/work/eclipse/p2composite/p2composite-example/p2composite.example.site/target/eclipserun-work/configuration,-application,org.eclipse.ant.core.antRunner,-buildfile,packaging-p2composite.ant,p2.composite.add,-Dsite.label=Composite Site Example,-Dproject.build.directory=/home/bettini/work/eclipse/p2composite/p2composite-example/p2composite.example.site/target,-DunqualifiedVersion=1.0.0,-DbuildQualifier=v20150121-1828]
Let’s have a look at the remote directory, it will contain the create p2 composite site
Let’s perform another release; Our local copy is up-to-date so we won’t receive anything during the update phase, but then we’ll commit another release
[/usr/lib/jvm/java-7-oracle/jre/bin/java,-jar,/media/app/.m2/repository/p2/osgi/bundle/org.eclipse.equinox.launcher/1.3.0.v20140415-2008/org.eclipse.equinox.launcher-1.3.0.v20140415-2008.jar,-install,/home/bettini/work/eclipse/p2composite/p2composite-example/p2composite.example.site/target/eclipserun-work,-configuration,/home/bettini/work/eclipse/p2composite/p2composite-example/p2composite.example.site/target/eclipserun-work/configuration,-application,org.eclipse.ant.core.antRunner,-buildfile,packaging-p2composite.ant,p2.composite.add,-Dsite.label=Composite Site Example,-Dproject.build.directory=/home/bettini/work/eclipse/p2composite/p2composite-example/p2composite.example.site/target,-DunqualifiedVersion=1.0.0,-DbuildQualifier=v20150121-1832]
Let’s have a look at sourceforge and see the new release
Let’s remove our local copy and try to perform another release, this time the update phase will make sure our local composite repository is synchronized with the remote site (we’ll get the whole composite site we had already released), so that when we add another composite child we’ll update our local composite repository; then we’ll commit the changes to the server (again, by uploading only the modified files, i.e., the compositeArtifacts.xml and compositeContent.xml and the new directory with the new child repository:
[/usr/lib/jvm/java-7-oracle/jre/bin/java,-jar,/media/app/.m2/repository/p2/osgi/bundle/org.eclipse.equinox.launcher/1.3.0.v20140415-2008/org.eclipse.equinox.launcher-1.3.0.v20140415-2008.jar,-install,/home/bettini/work/eclipse/p2composite/p2composite-example/p2composite.example.site/target/eclipserun-work,-configuration,/home/bettini/work/eclipse/p2composite/p2composite-example/p2composite.example.site/target/eclipserun-work/configuration,-application,org.eclipse.ant.core.antRunner,-buildfile,packaging-p2composite.ant,p2.composite.add,-Dsite.label=Composite Site Example,-Dproject.build.directory=/home/bettini/work/eclipse/p2composite/p2composite-example/p2composite.example.site/target,-DunqualifiedVersion=1.0.0,-DbuildQualifier=v20150121-1837]
For our example the URL can be one of the following:
With mirrors: http://sourceforge.net/projects/eclipseexamples/files/p2composite.example/updates/
Main site: http://master.dl.sourceforge.net/project/eclipseexamples/p2composite.example/updates/
You may want to try them both in Eclipse.
Please keep in mind that you may hit some unavailability errors now and then, if sourceforge sites are down for maintenance or unreachable for any reason… but that’s not much different when you hit a bad Eclipse mirror, or the main Eclipse download site is down… I guess no hosting site is perfect anyway 😉
I hope you find this blog post useful, Happy releasing! 🙂
The goal of composite repositories is to make this task easier by allowing you to have a parent repository which refers to multiple children. Users are then able to reference the parent repository and the children’s content will transparently be available to them.
The nice thing of composite repositories is that they can be nested at any level. Thus, I like to have nested composite repositories according to the major.minor, major.minor.service.qualifier.
Thus the layout of the p2 composite repository should be similar to the following screenshot
Note that the name of the directories that contain a standard p2 repository have the same name of the contained feature.
The key points of a p2 composite repository are the two files compositeArtifacts.xml and compositeContent.xml. Their structure is simple, e.g.,
XHTML
1
2
3
4
5
6
7
8
9
10
11
12
13
<?xml version='1.0'encoding='UTF-8'?>
<?compositeMetadataRepository version='1.0.0'?>
<repository name='Composite Site Example All Versions'type='org.eclipse.equinox.internal.p2.metadata.repository.CompositeMetadataRepository'version='1.0.0'>
Note that a child location is intended relative to the path of these files; you can also specify absolute paths, not to mention http urls to other remote p2 sites.
The structure is not that complex, so you can also create it by hand; but keeping it up to date might not be that trivial. With that respect, p2 provides some ant tasks for managing composite repositories (creating, adding an entry, removing an entry), and that’s my favorite way to deal with composite repositories. I’ll detail what I usually do in this blog post, in particular, how to create (or update) a p2 composite repository with a new entry during the build.
The ant file is completely reusable and customizable by passing properties; you can reuse it as it is, after you setup your pom.xml as detailed below.
In this blog post I’ll show how to do that with Maven/Tycho, but the same procedure can be done in a Buckminster build (as I’ll hint at the end).
I’ll use a simple example, https://github.com/LorenzoBettini/p2composite-example, consisting of a plug-in project, a feature project, a project for the site, and a releng project (a Maven/Tycho parent project). The plug-in and feature project are not interesting in this context: the most interesting one is the site project (a Tycho eclipse-repository packaging type).
Of course, in order to run such ant tasks, you must run them using the org.eclipse.ant.core.antRunner application. Buckminster, as an Eclipse product, already contains that application. With Tycho, you can use the tycho-eclipserun-plugin, to run an Eclipse application from Maven.
We use this technique for releasing a new version of our EMF-Parsley Eclipse project. We do that directly from our Hudson HIPP instance; the idea is that the location of the final main composite site is the one that will be served through HTTP from the download.eclipse.org. We have a dedicated Hudson job that will release a new version and put it in the composite repository.
The ant file
The internal details of this ant files are not necessary to reuse it, so you can skip the first part of this section (you only need to know the main properties to pass). Of course, if you read it and you have suggestions for improve it, I’d be very grateful 🙂
The ant file consists of some targets and macro definitions.
The main macro definition is the one invoking the p2 ant task:
Note that we’ll also create a p2.index file. I prefer not to compress the compositeArtifacts.xml and compositeContent.xml files for easier inspection or manual modification, but you can compress them setting the “compressed” to “true” property above.
First of all, this task will copy the p2 repository created during the build in the correct place inside the nested p2 composite repository.
Then, it will create or update the composite site for the nested repository major.minor, and then it will create or update the composite site for the main site (the one storing all the versions). The good thing about these ant tasks is that if you add a child location that already exists they won’t complain (though you can set a property to make them fail in such situations); this is crucial for updating the main repository, since most of the time you will not release a new major.minor.
This target calls (i.e., depends on) another target to compute the properties to pass to the macrodef, according to the information passed from the pom.xml
XHTML
1
2
3
4
5
6
7
8
9
10
11
12
13
14
15
16
17
18
19
20
<!--
site.label The name/title/label of the created composite site
unqualifiedVersion The version without any qualifier replacement
Default properties (that can be modified by passing a value from the pom.xml file):
software.download.area: the absolute path of the parent folder for the composite p2 site (default is “p2.repositories” in your home directory)
updates.dir: the relative path of the composite p2 site (default is “updates”); this is relative to software.download.area
Thus, by default, the main p2 composite update site will end in ${user.home}/p2.repositories/updates. As hinted in the beginning, this can be any absolute local file system path; in EMF-Parsley Eclipse, since we release from Hudson, it will be the path served by the Eclipse we server download.eclipse.org. So we specify the two above properties accordingly.
These are the properties that must be passed from the pom.xml file
site.label: the main label that will appear in the composite site (and that will be recorded in the “Eclipse available sites”). The final label will be “${site.label} All Versions” for the main site and “${site.label} <major.minor>” for the nested composite sites.
project.build.directory: the location of the p2 repository created during the build (usually of the shape <project.id>/target/repository)
unqualifiedVersion: the version without qualifier (e.g., 1.1.0)
buildQualifier: the replaced qualifier in the built version
Note that except for the first property, the other ones have exactly the same name as the ones in Tycho (and are set by Tycho directly during the build, so we’ll reuse them).
The ant file will use an additional target (not shown here, but you’ll find it in the sources of the example) to extract the major.minor part of the passed version.
Calling the ant task from pom.xml
Now, we only need to execute the above ant task from the pom.xml file of the eclipse-repository project,
ATTENTION: in the following snipped, for the sake of readability, I split the <appArgLine> into several lines, but in your pom.xml it must be exactly in one (long) line.
As I said, you should pass site.label as you see fit (for the other properties you can use the default).
You may want to put this plugin specification inside a Maven profile, that you activate only when you are actually doing a release (see, e.g., what we do in this pom.xml, taken from our EMF-Parsley Eclipse project).
[echo]Composite name:Composite Site Example All Versions
[echo]Adding childrepository:1.0
BUILD SUCCESSFUL
And here’s the directory layout of your ${user.home}/p2.repositories
Run the command again, and you’ll get another child in the nested composite repository 1.0 (the qualifier has been replaced automatically with the new timestamp):
Let’s increase the service number, i.e., 1.0.1, (using the tycho-versions-plugin) and rebuild:
As I hinted before, with Buckminster you can directly call the p2 ant tasks, since they are included in the Buckminster headless product. You will only need to add custom actions in the .cspec (or in the .cspex if you’re inside a plugin or feature project) that call the ant task passing the right properties. An example can be found here. This refers to a slightly different ant file from the one shown in this blog post, but the idea is still the same.
Possible Improvements
You may want to add another nesting level, e.g., major -> major.minor etc… This should be straightforward: you just need to call the macrodef another time, and compute the main update site directory differently.
I recently started to play with Sonarqube to reduce “technical debt” and hopefully improve code quality (see my previous post). I’d like to report on my experiences about using Sonarqube to analyze Xtend code.
Xtend compiles into Java source code, so it looks like it is trivial to analyze it with Sonarqube; of course, Sonarqube will analyze the generated Java code, but it’s rather easy to refer to the original Xtend code, since Xtend generates clean Java code 🙂
However, we Sonarqube 4.4 it looks like it’s harder than I thought due to some facts:
Xtend automatically adds @SuppressWarnings(“all”) annotations to all generated Java classes.
In the parent project we specify the actual project with sources to be analyzed, and the project containing tests (in this example I also use jacoco for code coverage, but that’s not crucial for this example):
The plugin and the plugin.tests projects intentionally contain Xtend and Java files with some Findbugs issues, e.g.,
Java
1
2
3
4
5
6
7
8
9
10
11
12
13
classXtendGreeting{
def greeting(){
"Hello, world."
}
def useEquals(){
// 2 findbugs issues:
// findbugs:DM_NUMBER_CTOR
// findbugs:EC_UNRELATED_TYPES
newInteger(0).equals("foo");
}
}
Java
1
2
3
4
5
6
7
8
9
10
11
12
13
14
15
16
17
18
19
20
packageexample
importorg.junit.Test
importorg.junit.Assert
classXtendGreetingTest{
@Testdef voidtestGreeting(){
val greeting=newXtendGreeting().greeting
println(greeting)
Assert.assertEquals("Hello, world.",greeting)
}
def useEquals2(){
// 2 findbugs issues:
// findbugs:DM_NUMBER_CTOR
// findbugs:EC_UNRELATED_TYPES
newInteger(0).equals("foo");
}
}
Now, assuming you have Sonarqube 4.4 running on your machine, you can run the typical maven commands to analyze your code (make sure you set the MaxPermSize in the MAVEN_OPTS otherwise the Xtend compiler will run out of memory):
Shell
1
2
3
export MAVEN_OPTS="-Xmx512m -XX:MaxPermSize=256m"
mvn clean install
mvn sonar:sonar
If you go to Sonarqube web interface you see
So you see that Sonarqube correctly detected Findbugs issues in all the Java files, but for the Java code generated by Xtend, it only detected the issues in the plugin.tests project, not on the plugin project (as explained here http://sonarqube.15.x6.nabble.com/sonarqube-findbugs-and-generated-sources-td5028237.html, Sonarqube does “not take into consideration this suppress warnings annotation in test files”).
To deal with this problem, I created an ant file which basically removes all the @SuppressWarnings(“all”) annotations in all the generated Java files in the xtend-gen folder:
and I created a Maven profile in the parent pom that, when activated, invokes the ant target, in the process-sources phase (recall that this phase is executed after generate-sources phase, when the Xtend files are compiled into Java code)
I recently started to play with Sonarqube to reduce “technical debt” and hopefully improve code quality. I’d like to report on my experiences about using Sonarqube to analyze Xsemantics, a DSL for writing rule systems (e.g., type systems) for Xtext languages.
I was already using the Jenkins Continuous Integration server, and while building I was already using Findbugs and Jacoco, thus, I was already analyzing such software, but Sonarqube brings new analysis rules for Java programs and it also integrates results from Findbugs and Jacoco, aggregating all the code quality results in a web site.
In spite of the Jenkins builds Sonarqube detected some issues when I started
First of all, I had to exclude the src-gen and emf-gen directories (the former is where Xtext generates all its artifacts, and the latter is where Xcore generates the EMF model files); since these are generated files and I did not want to make them part of the analysis. I’ve done such exclusion with a property in the main pom.xml (for readability I split it into lines):
XHTML
1
2
3
4
5
6
7
8
9
10
11
12
<sonar.exclusions>
file:**/src-gen/**,
file:**/emf-gen/**,
file:**/example/**,
file:**/tests/**,
**/*RuntimeModule.java,
**/*UiModule.java,
**/*XcoreReader.java,
**/*UiExamples.java,
**/*TypeSystemGen*.java,
**/*StandaloneSetup*.java
</sonar.exclusions>
Note that for the moment I’m also excluding tests from the analysis… it is considered best practice to analyse tests as well (and I have many of them), but I wanted to concentrate on the code first. I also excluded other Java files for which issues are reported, like the Xtext Guice modules, due to the wildcards in the method signatures… I have to live with them anyway 🙂
After that the number of issues reduced a little bit, but there were still some issues to fix; most of them were easy, basically due to Java conventions I hadn’t use (e.g., name of fields and methods or even names of type parameters).
Another thing that I had never considered was dependency cycles among Java packages and files. Sonarqube reports them. Luckily there were only few of them in Xsemantics, and the hardest part was to read the Dependency Structure Matrix, but in the end I managed to remove them (there must be nothing in the upper triangle to have no cycle):
Then came the last major issue: Duplicated Code!!! All by itself this issue was estimated with 13 days of technical debt! And most of the duplicated code was in the model inferrer (a concept from Xbase). Moreover, such inferrer is written in Xtend, a cleaner Java, and the Xtend compiler then generates Java code. Thus, Sonarqube analyses the generated Java code, and the detected duplicate code blocks are on the Java code. This means that it takes some time to understand the corresponding original Xtend code. That’s not impossible since Xtend generates clean Java code, but it surely adds some work 🙂
Before starting to remove duplicated code (around 80 blocks in the generated Java code) the Xtend inferrer was around 1090 lines long (many parts are related to string templates for code generation) corresponding to around 2500 lines of generated Java code! After the refactoring the Xtend inferrer was around 1045 lines long, and the generated Java code reduced to around 2000 lines.
That explains also the reduction of lines of code and complexity:
But now technical debt is 0 🙂
And it’s nice to look at this dashboard 🙂
By the way, I also had to disable some issues I did not agree on (tabulation characters) and avoid reported issues on method name conventions on a specific file (because methods that start with the underline characters _ have a specific meaning in Xtext/Xtend). Instead of disabling them on the Sonarqube web interface, I preferred to disable them using properties in the pom file so that it works across different Sonarqube installations (e.g., I also have a local Sonarqube instance on my machine to do some quick experiments). Such multi properties are not officially supported in the Sonar invocation (e.g., through the sonar runner or via Maven), but I found a workaround: http://stackoverflow.com/questions/21825469/configure-sonar-sonar-issue-ignore-multicriteria-through-maven (but, be careful, it is considered a hack as reported in the mailing list: http://sonarqube.15.x6.nabble.com/sonar-issue-ignore-multicriteria-td5021722.html):
XHTML
1
2
3
4
5
6
7
8
9
10
11
12
13
14
<!-- see http://sonarqube.15.x6.nabble.com/sonar-issue-ignore-multicriteria-td5021722.html and
I recently had to install Linux Kubuntu 13.10 Saucy Salamander (at the time of writing I’ve already upgraded it to 14.04 Trusty Tahr) on a Dell Precision M3800 (a really cool and powerful laptop, see the details here).
The installation went really smooth, and I’m enjoying a very fast and stable Linux OS on this laptop.
In this blog post I’ll detail only a few tips and further tweaks after the installation.
This laptop comes with the “crazy” resolution of 3200×1800! Unfortunately, this is barely usable at least in my experience: everything is so small that I can’t read almost anything… adjusting the DPI as suggested here really did not help: the fonts, window border become readable and usable, but the system looks ugly… (by the way, the same problem holds in Windows 8, at least for my everyday program, i.e., Eclipse: most fonts and icons are not readable)… until these resolution problems are fixed in Kubuntu (and in some applications as Eclipse), I reverted the resolution to something smaller (and still the resolution is high :), that is 1920×1080.
Enable Hibernate
First check that hibernate actually works by running (remember that your swap partition is at least as large as your available RAM):
1
sudo pm-hibernate
After you computer turns off, try and switch it back on. If your open applications re-open you can re-enable hibernate: run below command to edit the config file:
At first, I thought that Function keys were not working at all… then I discovered that on new laptops like this one F-keys are default to their media mode (!). You can change the default behavior of the F keys in the BIOS, but I prefer the F-Lock icon on the Esc button: this will take them back to their standard behavior.
Xcore is an extended concrete syntax for Ecore that, in combination with Xbase, transforms it into a fully fledged programming language with high quality tools reminiscent of the Java Development Tools. You can use it not only to specify the structure of your model, but also the behavior of your operations and derived features as well as the conversion logic of your data types. It eliminates the dividing line between modeling and programming, combining the advantages of each.
I took inspiration from Jan Köhnlein’s blog post; after switching to a manually maintained Ecore in Xsemantics, I felt the need to further switch to Xcore, since I had started to write many operation implementations in the metamodel, and while you can do that in Ecore, using Xcore is much easier 🙂 Thus in my case I was starting from an existing language, not to mention the use of Xbase (not covered in Jan’s post). Things were not easy, but once the procedure works, it is easily reproducible, and I’ll detail this for a smaller example.
So first of all, let’s create an Xtext project, org.xtext.example.hellocustomxcore, (you can find the sources of this example online at https://github.com/LorenzoBettini/Xtext2-experiments); the grammar of the DSL is not important: this is just an example. We will first start developing the DSL using the automatic Ecore model inference and later we will switch to Xcore.
(the language is basically the same of the previous post).
The grammar of this example is as follows:
1
2
3
4
5
6
7
8
9
10
11
12
13
14
15
16
17
18
grammar org.xtext.example.helloxcore.HelloXcore with
With this DSL we can write programs of the shape (nothing interesting, this is just an example)
1
2
3
4
5
Hellofoo!
Greetingbar{
sayFoo()+"bar"
}
Now, let’s say we want to check in the validator that there are no elements with the same name; since both “Hello” and “Greeting” have the feature name, we can introduce in the metamodel a common interface with the method getName(). OK, we could achieve this also by introducing a fake rule in the Xtext grammar, but let’s do that with Xcore.
Switching to Xcore
Of course, first of all, you need to install Xcore in your Eclipse.
Before we use the export wizard, we must make sure we can open the generated .genmodel with the “EMF Generator” editor (otherwise the export will fail). If you get an error opening such editor about resolving proxy to JavaJVMTypes.ecore like in the following screenshot…
..then we must tweak the generated .genmodel and add a reference to JavaVMTypes.genmodel: open HelloXcore.genmodel with the text editor, and search for the part (only the relevant part of the line is shown)
Since we’re editing the .genmodel file, we also take the chance to modify the output folder for the model files to emf-gen (see also later in this section for adding emf-gen as a source folder):
Now save the edited file, refresh the file in the workspace by selecting it and pressing F5 (yes, also this operation seems to be necessary), and this time you should be able to open it with the “EMF Generator” editor. We can go on exporting the Xcore file.
We want the files generated by Xcore to be put into the emf-gen source folder; so we add a new source folder to our project, say emf-gen, where all the EMF classes will be generated; we also make sure to include such folder in the build.properties file.
First, we create an .xcore file starting from the generated .genmodel file:
navigate to the HelloXcore.genmodel file (it is in the directory model/generated)
right click on it and select “Export Model…”
in the dialog select “Xcore”
The next page should already present you with the right directory URI
In the next page select the package corresponding to our DSL, org.xtext.example.helloxcore.helloxcore (and choose the file name for the exported .xcore file corresponding Helloxcore.xcore file)
Then press Finish
If you get an error about a missing EObjectDescription, remove the generated (empty) Helloxcore.xcore file, and just repeat the Export procedure from the start, and the second time it should hopefully work
The second time, the procedure should terminate successfully with the following result:
The xcore file, Helloxcore.xcore has been generated in the same directory of the .genmodel file (and the xcore file is also opened in the Xcore editor)
A dependency on org.eclipse.emf.ecore.xcore.lib has been added to the MANIFEST.MF
The new source folder emf-gen is full of compilation errors
Remember that the model files will be automatically generated when you modify the .xcore file (one of the nice things of Xcore is indeed the automatic building).
Fixing the Compilation Errors
These compilation errors are expected since Java files for the model are both in the src-gen and in the emf-gen folder. So let’s remove the ones in the src-gen folders (we simply delete the corresponding packages):
After that, everything compile fines!
Now, you can move the Helloxcore.xcore file in the “model” directory, and remove the “model/generated” directory.
Modifying the mwe2 workflow
In the Xtext grammar, HelloXcore.xtext, we replace the generate statement with an import:
The DirectoryCleaner fragment related the “model” directory should be removed (otherwise it will remove our Helloxcore.xcore file as well); and we don’t need it anymore after we manually removed the generated folder with the generated .ecore and .genmodel files.
Then, in the language part, you need to loadResource the XcoreLang.xcore, the Xbase and Ecore ecore and genmodel, and finally the xcore file you have just exported, Helloxcore.xcore.
We can comment the ecore.EMFGeneratorFragment (since we manually maintain the metamodel from now on).
The MWE2 files is now as follows (I highlighted the modifications):
1
2
3
4
5
6
7
8
9
10
11
12
13
14
15
16
17
18
19
20
21
22
23
24
25
26
27
28
29
30
31
32
33
34
35
36
37
38
39
40
41
42
43
44
45
46
47
48
49
50
51
52
...
Workflow{
bean=StandaloneSetup{
scanClassPath=true
platformUri="${runtimeProject}/.."
// The following two lines can be removed, if Xbase is not used.
// fragment = ecore.EMFGeneratorFragment auto-inject {}
...
Before running the workflow, you also need to add org.eclipse.emf.ecore.xcore as a dependency in your MANIFEST.MF.
We can now run the mwe2 workflow, which should terminate successfully.
We must now modify the plugin.xml (note that there’s no plugin.xml_gen anymore), so that the org.eclipse.emf.ecore.generated_package extension point contains the reference to the our Xcore file:
As we saw in the previous post, Junit tests do not work anymore with errors of the shape
1
org.eclipse.xtext.parser.ParseException:java.lang.IllegalStateException:Unresolved proxy http://www.xtext.org/example/helloxcore/HelloXcore#//Hello. Make sure the EPackage has been registered.
All we need to do is to modify the StandaloneSetup in the src folder (NOT the generated one, since it will be overwritten by subsequent MWE2 workflow runs) and override the register method so that it performs the registration of the EPackage (as it used to do before):
We can now customize our metamodel, using the Xcore editor.
For example, we add the interface Element, with the method getName() and we make both Hello and Greeting implement this interface (they both have getName() thus the implementation of the interface is automatic).
1
2
3
4
5
6
7
8
9
10
11
12
interfaceElement{
op StringgetName()
}
classHelloextendsElement{
Stringname
}
classGreetingextendsElement{
Stringname
contains XExpression expression
}
Using the Xcore editor is easy, and you have content assist; as soon as you press save, the Java files will be automatically regenerated:
We also add a method getElements() to the Model class returning an Iterable<Element>(containing both the Hello and the Greeting objects). This time, with Xcore, it is really easy to do so (compare that with the procedure of the previous post, requiring the use of EAnnotation in the Ecore file), since Xcore uses Xbase expression syntax for defining the body of the operations (with full content assist, not to mention automatic import statement insertions). See also the generated Java code on the right:
And now we can implement the validator method checking duplicates, using the new getElements() method and the fact that now both Hello and Greeting implement Element:
When you use Xtext for developing your language the Ecore model for the AST is automatically derived/inferred from the grammar. If your DSL is simple, this automatic meta-model inference is usually enough. However, there might be cases where you need more control on the meta-model and in such cases you will want to switch from an inferred Ecore model to a an imported one, which you will manually maintain. This is documented in the Xtext documentation, and in some blog posts. When I needed to switch to an imported Ecore model for Xsemantics, things have not been that easy, so I thought to document the steps to perform some switching in this tutorial, using a simple example. (I should have talked about that in my Xtext book, but at that time I ran out of pages so there was no space left for this subject 🙂
So first of all, let’s create an Xtext project, org.xtext.example.hellocustomecore, (you can find the sources of this example online at https://github.com/LorenzoBettini/Xtext2-experiments); the grammar of the DSL is not important: this is just an example. We will first start developing the DSL using the automatic Ecore model inference and later we will switch to an imported Ecore.
The grammar of this example is as follows (to make things more interesting, we will also use Xbase):
1
2
3
4
5
6
7
8
9
10
11
12
13
14
15
16
17
18
grammar org.xtext.example.hellocustomecore.HelloCustomEcore with
With this DSL we can write programs of the shape (nothing interesting, this is just an example)
1
2
3
4
5
Hellofoo!
Greetingbar{
sayFoo()+"bar"
}
Now, let’s say we want to check in the validator that there are no elements with the same name; since both “Hello” and “Greeting” have the feature name, we can introduce in the Ecore model a common interface with the method getName(). OK, we could achieve this also by introducing a fake rule in the Xtext grammar, but let’s switch to an imported Ecore model so that we can manually modify that.
Switching to an imported Ecore model
First of all, we add a new source folder to our project (you must create it with File -> New -> Source Folder, or if you create it as a normal folder, you then must add it as a source folder with Project -> Properties -> Lava Build Path: Source tab), say emf-gen, where all the EMF classes will be generated; we also make sure to include such folder in the build.properties file:
1
2
3
4
5
6
7
8
source..=src/,\
src-gen/,\
xtend-gen/,\
emf-gen/
bin.includes=model/,\
META-INF/,\
.,\
plugin.xml
Remember that, at the moment, the EMF classes are generated into the src-gen folder, together with other Xtext artifacts (e.g., the ANTLR parser):
Xtext generates the inferred Ecore model file and the GenModel file into the folder model/generated
This is the new behavior introduced in Xtext 2.4.3 by the fragment ecore.EMFGeneratorFragment that replaces the now deprecatedecore.EcoreGeneratorFragment; if you still have the deprecated fragment in your MWE2 files, then the Ecore and the GenModel are generated in the src-gen folder.
Let’s rename the “generated” folder into “custom” (if in the future for any reason we want to re-enable Xtext Ecore inference, our custom files will not be overwritten):
NOTE: if you simply move the .ecore and .genmodel file into the directory model, you will not be able to open the .ecore file with the Ecore editor: this is due to the fact that this Ecore file refers to Xbase Ecore models with a relative path; in that case you need to manually adjust such references by opening the .ecore file with the text editor.
From now on, remember, we will manually manage the Ecore file.
Now we change the GenModel file, so that the EMF model classes are generated into emf-gen instead of src-gen:
We need to change the MWE2 file as follows:
Enable the org.eclipse.emf.mwe2.ecore.EcoreGenerator fragment that will generate the EMF classes using our custom Ecore file and GenModel file; indeed, you must refer to the custom GenModel file; before that we also run the DirectoryCleaner on the emf-gen folder (this way, each time the EMF classes are generated, the previous classes are wiped out); enable these two parts right after the StandaloneSetup section;
Comment or remove the DirectoryCleaner element for the model directory (otherwise the workflow will remove our custom Ecore and GenModel files);
In the language section we load our custom Ecore file,
and we disable ecore.EMFGeneratorFragment (we don’t need that anymore, since we don’t want the Ecore model inference)
The MWE2 files is now as follows (I highlighted the modifications):
Java
1
2
3
4
5
6
7
8
9
10
11
12
13
14
15
16
17
18
19
20
21
22
23
24
25
26
27
28
29
30
31
32
33
34
35
36
37
38
39
40
41
42
43
44
45
46
47
48
49
50
51
52
53
54
55
56
57
58
59
60
61
...
Workflow{
bean=StandaloneSetup{
scanClassPath=true
platformUri="${runtimeProject}/.."
// The following two lines can be removed, if Xbase is not used.
Now we’re ready to run the MWE2 workflow, and you should get no error (if you followed all the above instructions); you can see that now the EMF model classes are generated into the emf-gen folder (the corresponding packages in the src-gen folders are now empty and you can remove them):
We must now modify the plugin.xml (note that there’s no plugin.xml_gen anymore), so that the org.eclipse.emf.ecore.generated_package extension point contains the reference to the new GenModel file:
That’s because the generated StandaloneSetup does not register the EPackage anymore, see the diff:
All we need to do is to modify the StandaloneSetup in the src folder (NOT the generated one, since it will be overwritten by subsequent MWE2 workflow runs) and override the register method so that it performs the registration of the EPackage:
We can now customize our Ecore model, using the Ecore editor and the Properties view.
For example, we add the interface Element, with the method getName() and we make both Hello and Greeting implement this interface (they both have getName() thus the implementation of the interface is automatic).
We also add a method getElements() to the Model class returning an Iterable<Element> (containing both the Hello and the Greeting objects)
and we implement that method using an EAnnotation, using the source “http://www.eclipse.org/emf/2002/GenModel” and providing a body
Let’s run the MWE2 workflow so that it will regenerate the EMF classes.
And now we can implement the validator method checking duplicates, using the new getElements() method and the fact that now both Hello and Greeting implement Element:
Modified the SWTBot test so that it can be reused also in a test suite (see the comments to this post).
I happened to give a lecture at the University of Florence on Test Driven Development; besides the standard Junit tests I wanted to show the students also some functional tests with SWTBot. However, I did not want to introduce Eclipse views or dialogs, I just wanted to test a plain SWT application with SWTBot.
In the beginning, it took me some time to understand how to do that (I had always used SWTBot in the context of an Eclipse application); thanks to Mickael Istria, who assisted me via Skype, it ended up being rather easy.
assertResultGivenInput("foo","Not a valid input");
}
@Test
publicvoidtestNonValidInput(){
assertResultGivenInput("-1","Not a valid input");
}
}
There are a few things to note in the abstract base class:
You need to spawn the application in a new thread (the bot will run in a different thread)
You must start the application before creating the bot (otherwise the Display will be null)
after that you can simply use SWTBot API as you’re used to.
Note that the thread will create our window and then it will enter the event loop; this thread synchronizes with the @Before method (executed before each test), which creates the SWTBot (using the shell created by the thread). The @After method (executed after each test), will close our window, so that each test is independent from each other. The thread executes in an infinite loop, thus as soon as the shell is closed it will create a new one, etc.
Of course, this must be executed as a “Junit test”, NOT as a “Plug-in Junit test”, neither as a “SWTBot Test”, since we do not want any Eclipse application while running the test:
In the sources of the example you can find also the files to run the tests headlessly with Buckminster or with Maven/Tycho. Just enter the directory mathutils.build and
During the headless run, first the Junit tests for the implementation of the factorial will be executed (these are not interesting in the context of SWTBot) and then the SWTBot tests will be executed.
Up to now, I was always putting the Xtend generated Java files in my git repositories (for my Xtext projects), since I still hadn’t succeeded in invoking the Xtend standalone compiler in a Buckminster build. Dennis Hübner published a post with some hints on how to achieve that, but that never worked for me (and apparently it did not work for other users).
After some experiments, it seems I finally managed to trigger Xtend compilation in Buckminster builds, and in this post I’ll show the steps to achieve that (I’m using an example you can find on Github).
The main problems I had to solve were:
how to pass the classpath to the Xtend compiler
how to deal with chicken-and-egg problems (dependencies among Java and Xtend classes).
IMPORTANT: the build process described here uses a new flag for the Buckminster’s build command, which has been recently added; thus, you must make sure you have an updated version of Buckminster headless (from 4.3 repository).
The steps to perform can be applied to your projects as well; they are simple and easy to reproduce. In this blog post I’ll try to explain them in details.
This blog post assumes that you are already familiar with setting up a Buckminster build.
The example
The example I’m using is an Xtext DSL (just the Greeting example using Xbase), with many .xtend files and with the standard structure:
org.xtext.example.hellobuck, the runtime plugin,
org.xtext.example.hellobuck.ui, the ui plugin, which uses Xtend classes defined in the runtime plugin,
org.xtext.example.hellobuck.tests, the tests plugin, which uses Xtend classes defined in the runtime and in the ui plugin,
org.xtext.example.hellobuck.sdk, the SDK feature for the DSL.
Furthermore, we have two additional projects created by the Xtext Buckminster Wizard:
org.xtext.example.hellobuck.buckminster, the releng project,
org.xtext.example.hellobuck.site, the feature project for creating the p2 repository,
Creating a launch configuration for the Xtend compiler
The first step consists in creating a Java launch configuration in the runtime plugin project that invokes the Xtend standalone compiler. This was shown in Dennis’ original post, but you need to change a few things. Here’s the XtendCompiler.launch file to put in the org.xtext.example.hellobuck runtime plugin project (of course you can call the launch file whateven you want):
This launch configuration can be reused in other projects, provided the highlighted lines are changed accordingly, since they refer to the containing project.
An important part of this launch configuration is the PROGRAM_ARGUMENTS that are passed to the Xtend compiler, in particular the -classpath argument. This was the main problem I experienced in the past (and that I saw in all the other posts in the forum): the Xtend compiler needs to find the Java classes your Xtend files depend upon and thus you need to pass a valid -classpath argument. But we can simply reuse the classpath of the containing project 🙂
This launch configuration calls the Java application org.eclipse.xtend.core.compiler.batch.Main thus you must add a dependency on the corresponding bundle in your MANIFEST.MF. The bundle you need to depend on is org.eclipse.xtend.standalone (the dependency can be optional):
Test the launch in your workbench
You can test this launch configuration from Eclipse, with Run As => Java Application. In the Console view you should see something like:
This will give you confidence that the launch configuration works correctly and that all dependencies for invoking the Xtend compiler are in place.
Add an XtendCompiler.launch in the other projects
You must now add an XtendCompiler.launch in all the other projects containing Xtend files. In our example we must add it to the ui and the tests projects.
You can copy the one you have already created but MAKE SURE you update the relevant 3 parts according to the containing projects! See the highlighted lines above.
NOTE: you do NOT need to add a dependency on org.eclipse.xtend.standalone in the MANIFEST.MF of the ui and tests projects: they depend on the runtime plugin project which already has that dependency.
You may want to run the XtendCompiler.launch also in these projects from the Eclipse workbench, again to get confidence that you configured the launch configurations correctly.
IMPORTANT: when the Xtend compiler compiles the files in the ui and tests project, you will see some ERROR lines, e.g.,
From what I understand, these errors do not prevent the Xtend compiler to successfully generate Java files (see the final INFO line) and the procedure terminates successfully. Thus, you can ignore these errors. If the Xtend compiler really cannot produce Java files it will terminate with a final error.
Configure the headless build
Now it’s time to configure the Buckminster headless build so that it runs the Xtend compiler. We created .launch files because one of the cool things of Buckminster is that it can seamlessly run the launch files.
The tricky part here is that since we perform a clean build, there is a chicken-and-egg scenario
no Java files have been compiled,
most Java files import Java files created by Xtend
the Xtend files import Java classes
To solve these problems we perform an initial clean build; this will run the Java compiler and such compilation will terminate with errors. We expect that, due to the chicken-and-egg situation. However, this will create enough .class files to run the Xtend compiler! It is important to run the build command with the (new) flag –continueonerror, otherwise the whole build will fail.
After running XtendCompiler.launch in the org.xtext.example.hellobuck runtime project, we run another build –continueonerror so that the Java files generated by the Xtend compiler will be compiled by Java. We then proceed similarly for the ui and the tests project:
1
2
3
4
5
6
7
8
9
10
11
12
13
14
15
16
17
18
19
20
clean
# this first Java build will fail with compilation errors, since Xtend
# classes have not been compiled yet. However, it will compile some
# Java classes so that we will be able to compile Xtend classes
Then, your build can proceed as usual (at this point I prefer to perform a clean build): run the tests (both plain Junit and Plug-in Junit tests) and create the p2 repository:
You can now run your headless build on your machine or on Jenkins.
My favorite way of doing that is by using an ANT script. The whole ANT script can be found in the example.
This script also automatically installs Buckminster headless if not present.
Before executing the commands file, it also removes the contents of the xtend-gen folder in all the projects; this way you are sure that no stale generated Java files are there.
Of course, you should now remove the xtend-gen folder from your git repository (and put it in the .gitignore file).
In Jenkins you can configure an Invoke Ant build step as shown in the screenshot (“Start Xvfb before the build, and shut it down after” is required to execute Plug-in Junit tests; we also pass an option to install Buckminster headless in the job’s workspace).
As noted above, this will also install Buckminster headless if not found in the location specified by the property buckminster.home. This script will take some time, especially the first time, since it will materialize the target platform.
Updated the steps for entering download mode so that Odin can detect your phone.
I’ve always wanted to update my Samsung Galaxy Wonder to Android Jelly Bean; lately my cellphone became quite slow (especially after the latest upgrades to Android 2.3 from Samsung) and I always wanted to install Chrome and Google Keep that both require Android 4. Samsung does not provide any official release of Android 4, so I decided to go for a custom ROM. In particular, I’m using Android Jelly Bean, 4.2.2, CyanogenMod 10.1 ALPHA (Build 7).
I had quite a hard time to understand how to install it; basically because I had never installed a custom ROM. Moreover, the instructions to do that can be found on the web but I never found a complete tutorial that shows the procedure from the very start: they all assume that you have already done previous steps.
Then, I decided to write a complete tutorial (this is based on Windows). This assumes you have an external sdcard on the phone.
The update will wipe out all your data, so make sure you backup them first. Proceed at your own risk. You will also lose Samsung warranty.
Make sure you read the whole tutorial first, before proceeding.
Disclaimer: All the tools, mods or ROMs mentioned below belong to their respective owners/developers. I am not to be held responsible if you damage or brick your device.
USB Drivers
Make sure you can connect your Android phone with the computer. If not, install the USB drivers for Samsung Galaxy W properly. The easiest way is to install Samsung Kies.
Now you need to put your phone it into download mode, in order to upload the clockworkmod recovery file:
turn off phone,
hold Volume Down + Home + Power Button for a while till the phone turns on.
the phone will turn on and show some screen,
plug in usb cable
press Volume Up
At this point Odin should detect the connected phone
In Odin press the “Start” button, and the downloading should start (see the phone):
Wait for the download to finish (see Odin)
Now you can unplug and turn-off the phone.
Create a backup of the current image
Turn on the phone in the Recovery Mode: hold Volume Up + Home + Power Button for a while till the phone turns on (Note: this time it is “Volume Up”, not “Volume Down”). Release power button as soon as samsung logo appears and hold your volume up button + home button until clockworkmod recovery appears on the screen
To use the menus:
Volume buttons to move in the menu
Home button to select a menu
Power button to go back
Select “backup and restore” and then “backup to external sdcard”:
and wait for the backup to complete
You can now reboot the phone from the main screen. The phone will reboot as usual.
You may want to store a copy of the backup in your computer hard disk; just connect the phone with USB, and navigate to the directory where the backup was saved on the phone sdcard:
Put these files in the root folder of your external SD card (you can turn on the phone as usual and connect it via USB for that, or copy these files from the computer using an external card reader).
When the copy finished, disconnect the phone and turn it off.
Switch ON the phone in the Recovery Mode: pressing and holding Volume Up + Home + Power buttons together.
Now wipe data and cache selecting the following commands (and wait for them to complete)
Select “wipe data/factory reset”
Select “wipe cache partition”
Select “advanced” and then select “wipe dalvik cache”
Now go back to the main menu (Recall: use the power button to go back)
Select “install zip from sdcard” and choose the zip file containing the OS (in this case it is cm-10.1-20130611-EXPERIMENTAL-ancora-alpha7.zip) from the root of the SD card (where you previously copied it).
Now do the same for the google apps zip file: select “install zip from sdcard” and choose the zip file containing the OS (in this case it is gapps-jb-20130301-signed.zip) from the root of the SD card.
Reboot into the new system
Now you’re ready to reboot into the new system from the main menu!
NOTE: Your Phone will boot now and it might take about 5 minutes to boot on your first time. So, please wait.
If everything went fine, you should see the new logo
Then you should see all the menu screens for configuring the phone!
Note: as for me, this procedure started with an error message saying that the vocal synthesis engine crashed, but I simply ignored the message and went on.
After you inserted your Google account, the phone should be ready; at this point, if you selected an Internet connection, all the applications you had previously installed from Google Play should be installed automatically… it took about an hour in my case.
First Impressions
The system seems rather stable and surely more responsive than before!
Battery usage seems to have increased, especially when connected with WIFI.
All in all, I’m very happy of the new system. 🙂
External Sources
These are all the links where I found the software and information I based this tutorial on.
We use cookies on our website to give you the most relevant experience by remembering your preferences and repeat visits. By clicking “Accept All”, you consent to the use of ALL the cookies. However, you may visit "Cookie Settings" to provide a controlled consent.
This website uses cookies to improve your experience while you navigate through the website. Out of these, the cookies that are categorized as necessary are stored on your browser as they are essential for the working of basic functionalities of the website. We also use third-party cookies that help us analyze and understand how you use this website. These cookies will be stored in your browser only with your consent. You also have the option to opt-out of these cookies. But opting out of some of these cookies may affect your browsing experience.
Necessary cookies are absolutely essential for the website to function properly. These cookies ensure basic functionalities and security features of the website, anonymously.
Cookie
Duration
Description
cookielawinfo-checkbox-analytics
11 months
This cookie is set by GDPR Cookie Consent plugin. The cookie is used to store the user consent for the cookies in the category "Analytics".
cookielawinfo-checkbox-functional
11 months
The cookie is set by GDPR cookie consent to record the user consent for the cookies in the category "Functional".
cookielawinfo-checkbox-necessary
11 months
This cookie is set by GDPR Cookie Consent plugin. The cookies is used to store the user consent for the cookies in the category "Necessary".
cookielawinfo-checkbox-others
11 months
This cookie is set by GDPR Cookie Consent plugin. The cookie is used to store the user consent for the cookies in the category "Other.
cookielawinfo-checkbox-performance
11 months
This cookie is set by GDPR Cookie Consent plugin. The cookie is used to store the user consent for the cookies in the category "Performance".
viewed_cookie_policy
11 months
The cookie is set by the GDPR Cookie Consent plugin and is used to store whether or not user has consented to the use of cookies. It does not store any personal data.
Functional cookies help to perform certain functionalities like sharing the content of the website on social media platforms, collect feedbacks, and other third-party features.
Performance cookies are used to understand and analyze the key performance indexes of the website which helps in delivering a better user experience for the visitors.
Analytical cookies are used to understand how visitors interact with the website. These cookies help provide information on metrics the number of visitors, bounce rate, traffic source, etc.
Advertisement cookies are used to provide visitors with relevant ads and marketing campaigns. These cookies track visitors across websites and collect information to provide customized ads.


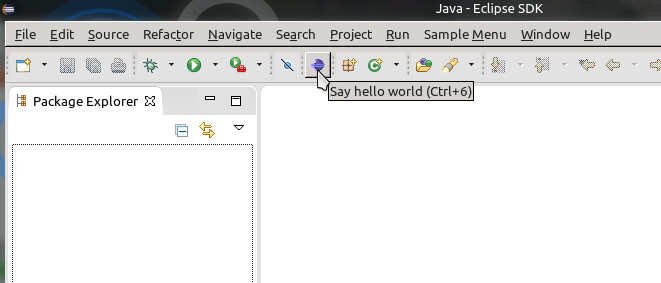


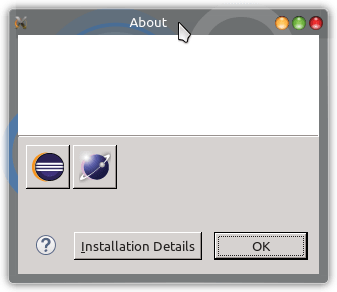
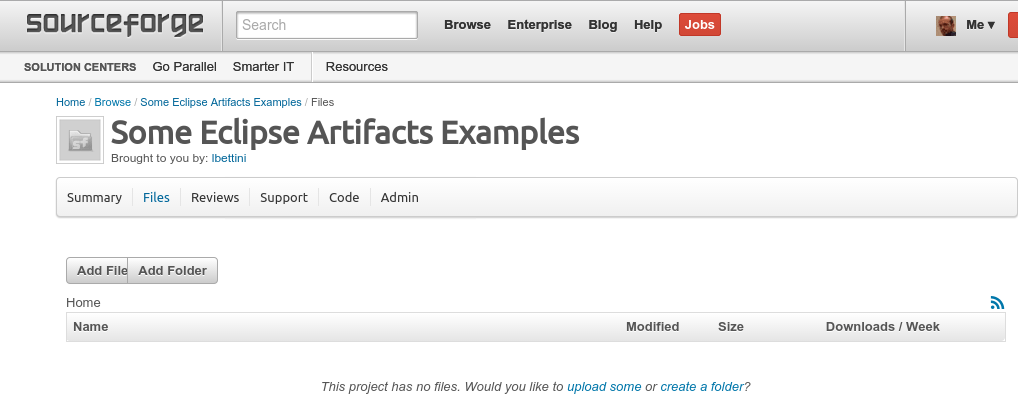

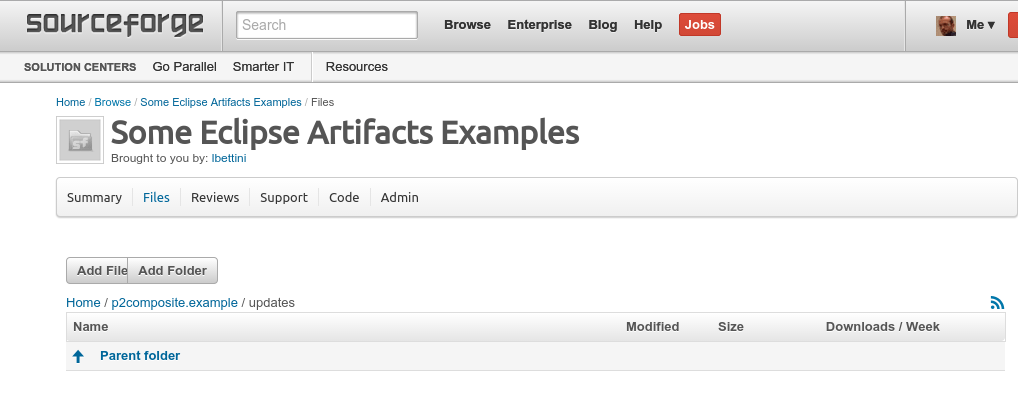

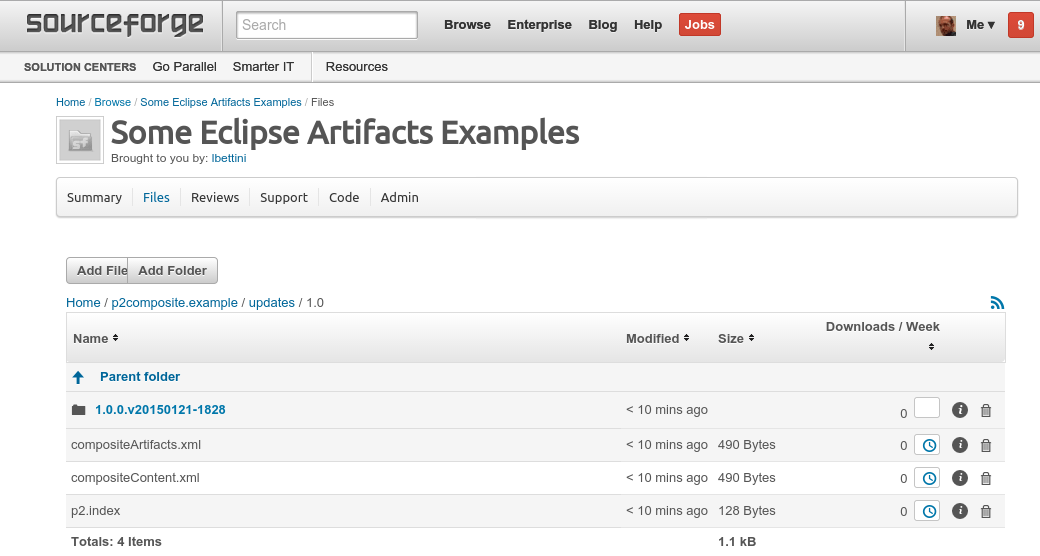


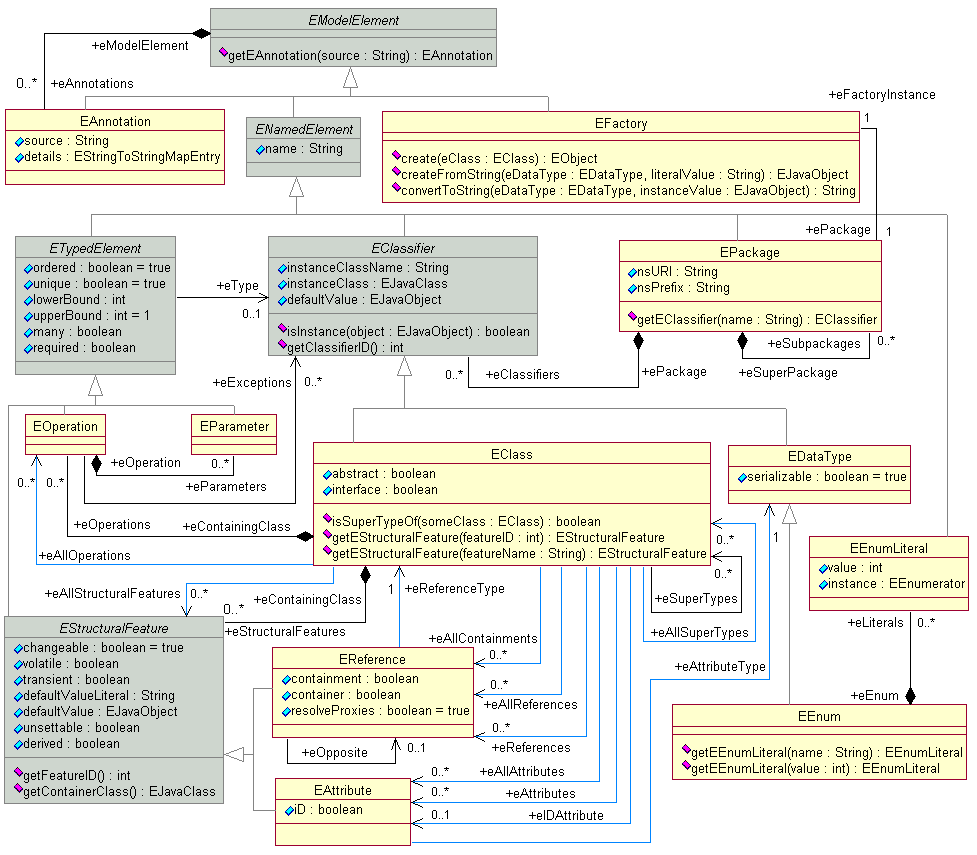