Monthly Archives: November 2022

A first look at XeroLinux

It’s been a long time since I wanted to test this Arch-based Linux distribution, XeroLinux. Finally, I found some time, and I first tested it in VirtualBox, and then I also installed that on one of my laptops.

What XeroLinux is about is summarized on its home page:

A Hobbyist Arch-Based Distro, built using ArcoLinux’s ALCI scripts that is meant to provide you with a stable base, making it simpler to install ArchLinux (Calamares) with a well optimized & Customized KDE Plasma, that you can shape YOUR way, the easy way… !

It’s an Arch-based distribution (not like Manjaro): it’s basically Arch with a few additional repositories that are mainly devoted to one of the main exciting features of XeroLinux, that is, a beautiful (good looking) KDE customized experience. And, although the “beauty is in the eye of the beholder”, XeroLinux KDE DE is indeed amazingly beautiful.

In this (long) post, I will summarize my overall experience of XeroLinux, starting from the installation to daily usage. Maybe it’s because I’m used to Arch, but I really like it!

Installation

The installation process starts, as usual, with a Live ISO. One of the fun things is that when you boot the Live image, the GRUB countdown emits a beep every second 🙂

When you get to the live environment, you can already understand the beauty of the KDE customizations (dock, global menus, blurring, etc.)

You’re then greeted by the XeroLinux Hello program:

If on a virtual machine, you can use one of the two buttons to fix the screen resolution. In general, you might want to “Update Arch Mirrorlist” right away. Then, just “Launch installer”.

The installer is based on the good old Calamares. If you’re already familiar with that, it will be easy! If not, it will not be that hard since the installer will ask you only the basic questions and will install all the default packages without further intervention.

Of course, the “Partitions” section is the critical one.

You probably wipe the whole (virtual) disk in a virtual machine. As usual, you can select a swap partition with hibernate. XeroLinux defaults to XFS, but I prefer BTRFS, which I’ve selected in my installations. As we’ll see later, the default layout of BTRFS subvolumes created by XeroLinux is also good!

When installed on my laptop, where I have several Linux installations, I chose the manual partitioning and manually created a new BTRFS partition while mounting another shared data partition. As usual, if you have an existing EFI partition, you must manually mount it in “/boot/efi”:

After reviewing the summary, it’s time to start the installation:

Do you see that green button on the bottom right? Click it, and you can see the log of the installer:

When the installation finishes, you get a message that the installation log can be found in the installed system:

The name of the LOG file is wrong. I opened a PR, https://github.com/xerolinux/calamares-config/pull/1. In any case, finding the LOG file in the /var/log directory in the installed system is easy.

Note: the first time I tried the installer on a virtual machine, Calamares crashed:

I had to start from scratch. The next time, I updated the mirrors before starting the installation, and the installation went fine. I can’t tell what went wrong the very first time.

The installed system

Let’s start with the impressions about the installed system.

The BTRFS subvolume layout looks good to me, or at least, that’s how I create the subvolumes myself in other distributions:

where, besides the standard @ and @home, we have @log, @tmp and @cache that correspond to the directories in /var, @root is for the /root folder, and @srv for /srv.

These are the mount options of the BTRFS subvolumes (in the /etc/fstab file):

I don’t like the “discard=async” in the file /etc/fstab. Since fstrim is enabled once a week, I prefer not to have “discard=async” so I edited /etc/fstab accordingly. From what I know, the “ssd” should not be necessary since BTRFS should recognize that it’s using an SSD. However, it shouldn’t harm.

Another thing I don’t like is that the journald log is not persisted on reboots. I reported that on the forum, https://forum.xerolinux.xyz/thread-184.html. Apparently, that’s not intended. I can fix this by editing /etc/systemd/journald.conf and changing the line

to the default (you could simply remove the line, but I prefer to comment it to remember that the default is “auto”):

Moreover, I had to delete the file /etc/systemd/journald.conf.d/volatile-storage.conf (which also contains the “Storage=volatile”). Reboot, and now the log stays there even after rebooting.

The home page mentions, “This distro is 90% ArchLinux & 10% custom.” Indeed, these are the additional packages https://github.com/xerolinux/xerolinux_repo/tree/main/x86_64. Besides a few pre-compiled packages (instead of the source versions of the same packages in the AUR repository), there are many packages about theming. I’d tend to say that XeroLinux is “very” Arch, and I like that.

The installed KDE

As I had already anticipated, the KDE desktop environment, customized by XeroLinux, looks really good. It uses many parts from the Lyan theme and Tela icons (I had already blogged about that), however, for the “Application Style”, it uses Lightly instead of Kvantum (as shown in the XeroLinux site and videos, you can easily switch to different themes, actually “rices”, provided by XeroLinux itself). I was already a fan of Lyan and Tela, so I liked the outcome.

You find a dock at the bottom, which is a Latte dock. (By the way, by default, the Latte dock is set to “Dodge Maximized”, which is not ideal for me: I prefer “Dodge Active”.) Also, the top panel is not a standard panel: it’s, again, a Latte panel. They are both transparent (blurred), and you have a global menu, a la macOS. I’m not a big fan of the global menu, but I’ll try to stick with that for the time being. There are a few useful widgets: in the bottom dock, you have the CPU usage, and in the top panel, you have the network usage.

For KDE applications, you don’t need to go to the menu if you use the shortcut “Ctrl + Alt + I,” which opens a global search on the menus of that application (the so-called HUD). For example, here’s the HUD for Dolphin:

Speaking of KDE Desktop effects, you have several effects enabled by default: “Slide back”, “Wobby Windows”, etc. Not the “Magic Lamp” effect, which is one of my favorites, but enabling that is easy.

Moreover, you get “blurred” in most places. It’s eye candy, and I like it 🙂 In that respect, as mentioned on the XeroLinux site, you need a powerful computer to deal with all these effects. On my Dell XPS 13, everything is smooth. Moreover, I don’t see such effects impacting power consumption when on battery.

Look at the blurred effect on the custom Konsole profile (which is set as the default one):

And what about the cool “ls” output? Well, that’s because “ls” is automatically aliased to exa, a modern replacement for ls.

Here are the blurred menus:

Lightly also can blur the Dolphin view, which is enabled by default. Unfortunately, since I’m using fractional scaling, that does not work.

By the way, Dolphin is already configured with the Dropbox plugin enabled. As soon as you install Dropbox, you have overlay decorations on the Dropbox folder.

Moreover, also the KDE drop-down terminal, Yakuake, is already configured and ready to use with F12.

Speaking of searching, the custom “Application Menu” separates search results (files, i.e., “Desktop search”, “Settings”, “Applications”, etc.):

A thing that gave me a few headaches with Kalendar and Korganizer (e.g., for accessing Google Calendar accounts) is that the KWallet subsystem is DISABLED by default (that’s one intentionally). As a consequence, I wasn’t able to access any Google calendar without any feedback. However, it’s just a matter of enabling the KWallet subsystem. By the way, I have no problem with the KWallet subsystem enabled, despite what was described in the XeroLinux forum as the motivation for disabling the KWallet subsystem.

XeroLinux specific features

The Xero Hello program is also very useful! It provides several menus

The “Install Drivers”:

I particularly like the “Post-Install System Configuration”:

For example, it has a menu for switching the shell from BASH to ZSH with Oh My Zsh (including a few common plugins, e.g., completions, suggestions, and source highlight, not to mention the beautiful Powerlevel10k theme). It takes care of cloning Oh My Zsh, and its plugins and sets the shell for the current user:

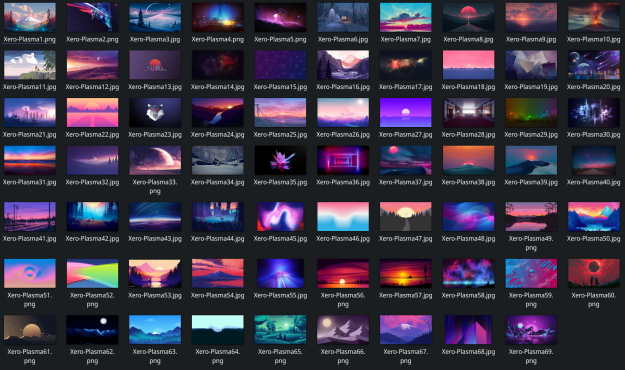
Speaking of beauty, XeroLinux comes with a very good set of good-looking wallpapers! (see https://github.com/xerolinux/kde-wallpapers/tree/main/usr/share/wallpapers):

The “Update System Now” is also very powerful. It gives you a choice to update Everything (by relying on Topgrade): not only Pacman, AUR, and Flatpak packages but also fuwpd, Oh My Zsh and its plugins (if you installed that), and Docker images (if you have installed Docker).

Final thoughts

I like XeroLinux, and I like its BEAUTIFUL theming! It makes me want to use KDE again 🙂

Most of all, I think it is similar to EndeavourOS, which I also like: it’s basically Arch (not like Manjaro, which I evaluated in the past, but which somehow twisted Arch) with interesting customizations.

Developing Ansible roles on a PineBook Pro with Gitpod

In a previous post, I showed an example of an Ansible role tested with Molecule and Docker using the Gitpod development environment. With such an approach, you develop using Visual Studio code on your browser. Resources and computational power is provided by Gitpod, not by your computer. When your computer is a PineBook Pro, an arm-based laptop with low computational power and just 4 Gb of RAM, using Gitpod makes the difference. Though I guess it’s possible to install Docker on the PineBook Pro, I doubt it’s feasible to efficiently use it for testing Ansible roles with Molecule and Docker.

But with Gitpod, it can be done! Here’s my Firefox browser on a PineBook Pro with an open Gitpod workspace:

I can quickly develop and run Molecule tests or manually enter the Docker containers after running Ansible playbooks on them!

I doubt developong and testing such things completely on a PineBook Pro would be this comfortable and efficient! 🙂

The Overview effect got better in KDE 5.26

I’ve updated KDE to version 5.26, which arrived in Linux Arch. In particular, I’m testing this new version in my XeroLinux installation.

One of the improvements that caught me immediately was how this version’s Overview effect has improved!

In the previous version (KDE 5.25), the Overview allowed to search both in applications and in currently opened windows (besides providing search results for other things such as files, folders, and other options configured in “Plasma Search”). However, opened windows and other search results were all mixed in the dropdown list. Although opened windows were reported slightly different from other results, they were all together. Moreover, open windows were not shown after you started typing in the filter text box. On the contrary, I would have liked some visual filtering for open windows, like in the “Present Windows” effect. For this reason, I was using “Present Windows” most of the time for searching for open windows and KRunner for everything else.

This behavior has changed now: the Overview behaves just like I would have liked. If what you typed in the search text box matches any open windows (name of the application or title of a window), the open windows are filtered, and no other search results are shown. On the contrary, if what you typed in the search text box does not match any open windows, you get the other results! Well done! 🙂

Here are a few screenshots demonstrating this new behavior (I opened a few applications and Firefox on a page containing “KDE” in the title).

This screenshot shows the Overview effect when invoked:

If I press “k”, only Kate, Konsole, and Firefox windows are shown (remember, Firefox has “KDE” in the title):

If I enter “ka”, only Kate is shown:

If I enter “ko”, only the two Konsole windows are shown:

If I enter “kd” or “fi”, then only Firefox is shown:

If I enter “chr”, then since “No matching windows” are found, I get the standard search results:

I hope this behavior of the Overview effect won’t change in future versions because I like it, and, IMHO, that’s how it should be 🙂

Note: as it happened in the past, the Overview effect sometimes crashes when you select a window or something from the search results. As a result, kwin restarts automatically. Sometimes, after an update, this is fixed. Sometimes, the bug shows up again.

As a comparison, this is the old behavior of the Overview. Here’s a screenshot with two applications opened, including a Konsole window:

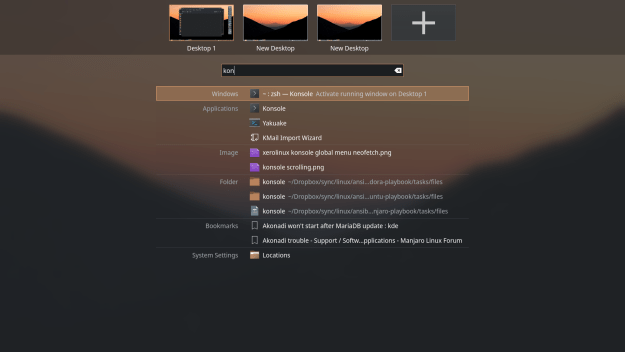
If I start typing “kon”, I get the full list of search results:

It is true that the open window of Konsole is the first result, but I find this old behavior harder to use: it’s harder to spot the open window.

An Ansible role tested with Molecule in Gitpod

I’m mainly a Java developer and still haven’t found a way to use Gitpod for Java development. Gitpod allows you to spin up fresh development environments from your GitHub projects so that you can code with Visual Studio on the web (that’s just a very reductive definition, so you may want to look at its website for the complete set of features). I honestly prefer to have my IDE (Eclipse) on my computer.

However, I probably found a use case for Gitpod that’s also good for me! I recently started playing and having fun with Ansible to automate all my Linux installations. I’m also test-addicted and want to test my Ansible playbooks and roles automatically. For testing Ansible playbooks and roles, I use the mainstream technology Molecule. Molecule allows you to thoroughly test Ansible tasks by running them against a Docker container. (I’ll blog about my Ansible playbooks, roles, and how I use Molecule shortly.)

Once you have Docker installed on your system, setting up Ansible and Molecule is not hard. However, due to the used technologies, running Molecule tests stresses your computer a bit due to disk usage (because of Docker images and containers; also because Molecule allows you to test Ansible tasks against different Docker images) and due to computational power. Indeed, it would be best if you had a powerful computer to use Molecule. I don’t always have one with such computation power with me; if I have, I might need that with some concurrent development tasks.

That gave me a chance to evaluate Gitpod for the task of testing an Ansible role with Molecule on Gitpod. In this blog post, I’ll detail, step by step, how I set up my Gitpod development environment for this job. The Ansible role used in this example is trivial and is not the post’s goal.

On my computer, I install Ansible and Molecule (with Docker support) with the following pip command:

Then I create an Ansible role ready to be tested with Molecule as follows:

I created a Git repository and pushed that to GitHub: https://github.com/LorenzoBettini/ansible-molecule-gitpod-example.

To access Gitpod easily from a GitHub repository, I installed the Gitpod browser extension.

Now, I can start Gitpod for this repository using the button (as I said, you need to use a browser extension; otherwise, you have to prefix the URL appropriately):

Let’s press the “Gitpod” button. The first time you use Gitpod, you’ll have to accept a few authorizations.

NOTE: in this blog post, I’m using the light theme of Visual Studio in Gitpod.

Once the Visual Studio code was open in the browser, I was welcomed by a “Get Started with Gitpod”:

First, let’s set up the main developer tools in the Gitpod workspace (a Linux OS): Ansible and Molecule. We’ll install them using Python Pip (as I’ve done on my local machine), which is already available in Gitpod.

In the Visual Studio terminal, I run:

The above command will take about a minute to terminate (we’ll get back to this later)

Then, we can verify that molecule (and ansible) are installed:

Now we can run Molecule from within the Gitpod workspace. We can try and run “molecule converge” (though our Ansible role doesn’t do anything at the moment). After that, we can enter the container with “molecule login” (from the generated molecule/default/molecule.yml file, we can see that it’s based on the Docker image “quay.io/centos/centos:stream8“):

Instead of running “converge”, we can let Molecule create the Docker image with “molecule create“. We would still be able to enter the Docker image as above.

Let’s stop the workspace:

(To close a workspace, we could close the workspace browser tabs: within three minutes, the workspaces will be stopped.)

If we get back to Gitpod and create a new workspace (that is, we don’t use the Gitpod dashboard to restart the workspace we have just stopped), we will lose the installed programs ansible and molecule. Let’s make the installation of these tools permanent, so we’ll find them each time we start a Gitpod workspace for this GitHub project.

To do that, let’s run “gp init“. This command will create a new .gitpod.yml file (with some example contents; see the documentation for more details about this file) where we can configure the workspace for our project. This configuration will be stored in the git repository of this project. Once this file is in place, Gitpod will pre-configure our workspace each time we enter Gitpod for the current project.

I’m changing the file as follows:

As written in the documentation:

To test your .gitpod.yml file, you need to commit and push the file to your repository and open a new workspace either by using the Gitpod extension or prefixing your repo URL with https://gitpod.io/#.

If you don’t want to have multiple commits as you’re testing and making changes to your .gitpod.yml, you can make changes from a new branch.

For the moment, let’s commit and push directly to the master or main branch (of course, by using Visual Studio):

Let’s stop the workspace and get back to Gitpod. We will see the output of our “init” command, and Ansible and Molecule will be available.

However, from what I understand, for installing programs that are indispensable during development, instead of using an “init” task, it’s better to provide a custom Docker image with the programs already installed.

To do that, we add this section to the .gitpod.yml file:

Then, we create the file .gitpod.Dockerfile. As soon as the file is created and opened, Visual Studio suggests we install the Docker extension in Visual Studio:

Let’s choose “Install Do not Sync”. Once the extension has been installed, we can use the gear icon and specify to add the extension to the .gitpod.yml file:

The file will be automatically modified with the following new section:

This way, each time we open the workspace of the project or someone else does (e.g., for contributing), the Docker extension will be automatically available.

Let’s implement the Dockerfile by starting from the full Gitpod workspace image (the one we have used so far because it’s the default image) and by installing Ansible and Molecule in the Docker image:

Note: Gitpod suggests using a specific tag instead of “latest” to help the reproducibility of the workspace. For this simple example, we’ll simply use “latest”.

Now that we have a custom Dockerfile for the image of our Gitpod workspace, instead of stopping the workspace and opening a new one, it might be better first to verify whether we can build such an image (remember, in Gitpod, you have docker available after all):

Then, we can enter that image and verify that our desired programs are installed:

Doing such a check before starting a new workspace lets us immediately spot possible problems with our custom image.

You notice that building the Docker image takes a lot of time. That’s because we started from the full Gitpod base Docker image (a big image), which contains support for several languages. We’ll optimize this later.

We remove the “init” task from the .gitpod.yml file. However, we can use a “before” task specific to this project (the pip packages are typical of Ansible and Molecule projects). We have Molecule create the Docker instance (see the molecule.yml file shown above in the screenshot). This will make the Docker image used in our Molecule tests already pulled when we open the workspace:

To summarize, this is the .gitpod.yml file (note that I also added the Gitlens extension, which is very useful for Git repositories):

We can start a new workspace. Now Gitpod knows about our custom Dockerfile and builds that image for us. In particular, whenever we start Gitpod for this repository, Gitpod checks whether the Dockerfile has been updated and rebuilds the image if needed. Thus, building our custom Docker image will take some time only the first time, and if we change the Dockerfile.

When the workspace start, we’ll see Gitpod building our image:

Similarly to when we built our custom Docker image in the workspace, this will take some time because we start from the vast “workspace-full” image.

Maybe we can do better and start from the Gitpod workspace image that provides only Python support. After all, for this project, that’s all we need (we don’t need Java, C++, etc.):

I also took the chance to update Pip itself. In the previous runs, I had seen such a message:

As done before, let’s first check that the image builds fine locally and that, in the end, it contains our required software.

We can start a new workspace. Gitpod realizes that our Dockerfile has changed and rebuilds it. This time, this should be faster.

It took some time, but now we have an IDE for our project on the web. The files we have created can be reused for similar projects. For projects using different languages, the customization will be different.

We can start implementing the tasks for our role. For example, let’s edit the file tasks/main.yml. In this example, we want to install ZSH:

Let’s save, and run “molecule converge” (remember, the Docker image for our molecule test has already been downloaded during the workspace opening). We’ll get an error:

That’s because “sudo”, which is required by our task (“become: true”), is not installed in the Docker image we use for testing (“quay.io/centos/centos:stream8“). We can prepare our instance with a molecule/default/prepare.yml playbook or use another RedHat-based Docker image, which already comes with “sudo”, e.g., “fedora:36”. For this simple example, I’ll go with the latter solution. We change molecule/default/molecule.yml accordingly:

Since we have now changed the Docker image for Molecule tests, we must first “destroy” the current Molecule image (“molecule destroy“) and then try to “molecule converge” (this time, a new Docker image will be downloaded). Now “converge” should succeed. We can also run a complete Molecule scenario with the command “molecule test” (this will also check idempotency and verify possible assertions; currently, we don’t have any assertions).

We can also add a badge to the README of the GitHub repository to quickly jump to Gitpod. That’s useful for contributors who don’t have the Gitpod extension. The markdown code for the badges can be found at https://www.gitpod.io/docs/introduction/getting-started. For this project, I add this markdown code to the README file:

You may want to experiment with other Visual Studio extensions like the “Ansible” extension. If you install that, you’ll get a warning of the shape:

That’s because we haven’t installed the command “ansible-lint”. We can do that with Pip. We should also update our custom Docker image accordingly. I will not do that for this simple example, though.

That’s all for now. I hope you found this post useful to get started with Gitpod 🙂